Kishik is basically a mixture of coarse burghul and salted laban (yoghurt) left to ferment for several days, milk is added at a later stage after which the mixture is left to ferment again then dried before being ground into a powder. In the old days, women in villages used to do most of the process before sending the mixture to the mill for grinding and I believe some still prefer the homemade one. Kishik is sold packaged in Lebanese groceries.

Kishik is versatile and has a sour taste which makes it ideal to cook with. Because of its texture, it easily absorbs fluids or juices from other complementing ingredients such as tomatoes and that is what makes this topping unusually delicious.

This is my own topping version, however, you can vary it to suit your taste, like for instance omitting tomatoes and adding onions.

Makes about 8 medium ones

Ingredients.

For the dough:

Follow the same amount and instructions as the ones for Manaeesh bi Zaatar

For the topping.

  • 100g / 4 oz  Kishik
  • 1 large juicy tomato finely chopped
  • 1 tbsp tomato paste diluted in 1 tbsp water
  • About 5 tbsp vegetable or olive oil
  • 2 tbsp pomegranate or lemon juice to taste

Method

    1. Prepare the bread dough as for Manaeesh bi Zaatar.
    2. Mix all the ingredients for the topping, the mixture should be spreadable. If you think it is stiff, loosen it with a little water. Set aside.
    3. When the rising time is up, take the dough and put it on a lightly floured surface. Punch it to get rid of the excess air, then knead again for about 3-4 minutes, alternatively, let the mixer do the kneading for 2 minutes.
    4. Divide the dough into 8 equal balls. On a lightly floured surface, roll out each ball with a lightly dusted rolling pin to 16cm/ 6½ inches circle, 3-4mm / 1/8 inch thick. Alternatively, you can make nicely shaped circles by using large cutters. Place the dough circles on the prepared baking parchment papers, cover and let them rest for another 20 minutes. Meanwhile, pre-heat the oven to 230ºC / 450ºF, heating up at the same time the baking sheets.
    5. When the resting time for the dough circles is up and they are ready to bake, uncover them and dimple the surface of each one with your fingertips to prevent it from puffing up during baking. Cover generously the top of each dough circle with the Kishik mixture leaving about 1cm / ½ inch gap around the edges. Next, slide the dough circles with their baking parchment onto the hot baking sheets, you may need to do them in batches. You have to be quick when you open the oven, as it is very important to maintain the same temperature all the time.
    6. Bake for 4-6 minutes, the edges should be slightly golden and the top bubbling hot. Transfer to a wire rack and serve while still hot or warm.

These Manaeesh b’Kishik freeze well.

I tend to make the individual dough circles slightly thicker than the ones with Zaatar because I think it suits the minced meat topping. However, this is a personal preference, therefore, it is up to you.

Makes about 8 medium ones or 6 (if you prefer them slightly thicker)

Ingredients.

For the dough:

Follow the same amount and instructions as the ones for Manaeesh bi Zaatar

For the topping

  • 240g/ 8½ oz minced lamb
  • Salt to taste & freshly milled black pepper
  • 1 tsp ground allspice
  • ½ tsp ground cinnamon
  • 1 medium onion finely chopped
  • 2 medium tomatoes finely chopped
  • 1 or 2 chillies (depending how hot you like it) finely chopped (optional)
  • 1 tbsp lemon juice
  • 2 tbsp pine nuts (optional)

To serve

  • Lemon wedges
  • Pickled cucumbers cut into thin slices (optional)
  • Plain yoghurt (optional)

Method

    1. Prepare the bread dough as for Manaeesh bi Zaatar
    2. As for the topping, except for the pine nuts, thoroughly mix all the ingredients until well combined, you may need to use your hands to achieve that. Taste and adjust if necessary. Keep aside until the dough is ready to bake.
    3. When the resting time for the dough circles is up and they are ready to bake, uncover them and dimple the surface of each one with your fingertips to prevent it from puffing up during baking. Cover generously the top of each dough circle with the meat mixture leaving about 1cm / ½ inch gap around the edges. If you are using pine nuts, scatter a few on each circle, pressing down gently with the back of a spoon. Next, slide the dough circles with their baking parchment onto the hot baking sheets, you may need to do them in batches. You have to be quick when you open the oven, as it is very important to maintain the same temperature all the time.
    4. Bake for about 8 minutes, the edges should be slightly golden and the top bubbling hot with the pine nuts turning a golden brown colour. Transfer to a wire rack and serve hot or warm.

NB. Lahm b’Ajeen freezes well.

Manaeesh bi Zaatar is our national breakfast. Suitable for everybody, more specifically for vegans and vegetarians as well as that, it freezes well.

The topping that we call Zaatar is basically a mixture of dried thyme, sumac and sesame seeds. You can buy it ready prepared from Middle Eastern or Lebanese grocers, it comes usually packaged.

Some cooks use the same bread dough for making the Flat Bread with the various toppings, others prefer the following one where the only difference is the addition of more oil. Both work well.

Makes about 8 medium ones

Ingredients.

For the dough:

  • 400g /14oz strong white flour, slightly warmed plus a little extra for dusting
  • 1tsp salt
  • 1 tsp easy blend yeast or its equivalent of fresh or dried yeast
  • About 200ml / 7fl oz lukewarm water
  • 2 tbsp vegetable or olive oil plus a little extra for greasing

You also need baking parchment paper cut to fit the baking sheets.

For the topping

  • 4 tbsp Zaatar
  • 100ml / 3½ fl oz extra virgin olive oil
  • 1 small onion finely chopped (optional)

Method

  1. Sift flour and salt into a large mixing bowl then mix in the yeast. Add the oil into the water. Make a well in the centre of the bowl and gradually tip in the water-oil mixture. Using your fingertips, combine all the ingredients, depending on the flour, you may need to add some more water, the dough should feel elastic and come away from the sides of the bowl. Transfer the dough to a lightly floured surface and knead for about 8-10 minutes. Alternatively, you could do the whole process in an electric mixer using the dough hook, thus reducing the kneading time by half (for about 5 minutes). In the end, the dough should feel spongy and elastic.
  2. Shape the dough into a ball then transfer to a lightly greased bowl and cover with a polythene bag or cling film, but make sure that they are lightly oiled to prevent the dough from sticking. Leave it in a warm place until it has doubled in size. The rising time usually takes one and a half to two hours.
  3. Meanwhile, mix the topping ingredients and set aside.
  4. When the rising time is up, take the dough and put it on a lightly floured surface. Punch it to get rid of the excess air, then knead again for about 3-4 minutes, alternatively, let the mixer do the kneading for 2 minutes.
  5. Divide the dough into 8-9 equal balls. On a lightly floured surface, roll out each ball with a lightly dusted rolling pin to 16cm/ 6½ inches circle, 3-4mm / 1/8 inch thick. Alternatively, you can make nicely shaped circles by using large cutters. Place the dough circles on the prepared baking parchment papers, cover and let them rest for another 20 minutes. Meanwhile, pre-heat the oven to 230ºC / 450ºF, heating up at the same time the baking sheets.
  6. When the resting time is up and ready to bake, uncover the dough circles and dimple the surface of each one with your fingertips to prevent it from puffing up during baking. Put 1 heaped tbsp of the prepared Zaatar mixture in the middle and spread it all over, leaving about 1cm / ½inch gap around the edges. Slide the dough circles with their baking parchment onto the hot baking sheets, you may need to do them in batches. You have to be quick when you open the oven, as it is very important to maintain the same temperature all the time.
  7. Bake for 4-8 minutes, the edges should be slightly golden and the top bubbling hot. Transfer to a wire rack and serve while still hot or warm.

Another variation which is vey nice. Omit the onion if using. Finely chop one juicy medium tomato and add it with 2 tsp of tomato puree to the ingredients for the toping, mix thoroughly, if it becomes too thick loosen it with some olive oil. Put one tbsp in the middle of the rolled out dough and spread it all over. Continue as above.

Lebanese bread is a fundamental staple in Lebanese cuisine, and perhaps it dates back to Phoenician times. In fact, the Egyptian philosopher Athenaeus who lived in the third century A.D wrote that the best bakers were brought from Phoenicia

http://www.foodtimeline.org/foodbreads.html

Lebanese bread is made from wheat flour, however, the Lebanese wheat grain is hard with a high gluten content which in turn contributes to the elasticity of the dough. People, including some Lebanese food writers, mistakenly call Lebanese bread Pitta Bread. It is true, that Pitta bread is the closest one to ours and a nice one too, but it is not the same, even supermarkets clearly make this distinction as they package them labelled with the appropriate name. Lebanese bread or as some also call it Arabic bread is round, thinner and more malleable: you can easily open it without breaking it. It is made to suit the Lebanese dishes and act as a perfect wrap for the different varieties of Shawarma, Kafta and so forth. Also, Lebanese bread comes in many sizes varying from the tiny little round ones, to medium sizes, to the large ones, about 30cm/ 12 inches.

Another type of bread is called Khubz Marqooq (Paper Thin Bread). It is literally very thin bread. Before baking was industrialised, Marqooq was a speciality that required lots of practice and skill. This was a tradition of the mountain villages whose women passed it from mother to daughter.

In this section, I included the basic recipe for the Lebanese bread, and there will be others for flat bread that is baked with a number of traditional toppings such as Manaeesh b’Zaatar (Thyme), Lahm b’Ajeen (Minced Meat) and Manaeesh b’Kishik (Dried Yoghurt).

Ajeenat al Khubz (Basic Bread Dough)

When making bread, the flour should be slightly warm, it makes a difference in speeding up the whole process. One more tip is heating up the baking sheets before baking the bread, the idea is to keep an even oven temperature and help the bread to puff up.

In this recipe, I use easy blend yeast, however, dried or fresh yeast also work well but you have to check the equivalent amount to the one recommended for the easy blend in this recipe. Whatever you decide to go for, follow the instructions of the manufacturer.   

Makes about 8 to 9 pieces.

Ingredients.

  • 400g/14 oz strong white flour, slightly warmed plus a little extra plus for dusting
  • 1½ tsp salt
  • 1 tsp easy blend yeast or its equivalent of fresh or dried yeast
  • About 200ml/ 7fl oz lukewarm water
  • 1 tbsp vegetable oil plus a little extra for greasing

You also need baking parchment paper cut to fit the baking sheets.

Method

  1. Sift flour and salt into a large mixing bowl then mix in the yeast. Mix the oil into the water. Make a well in the centre of the bowl and gradually tip in the water-oil mixture. Using your hands, combine all the ingredients, depending on the flour, you may need to add some more water, the dough should feel elastic and come away from the sides of the bowl. Transfer the dough to a lightly floured surface and knead for about 8-10 minutes. Alternatively, you could do the whole process in an electric mixer using the dough hook, thus reducing the kneading time by half (for about 5 minutes). In the end, the dough should feel spongy and elastic.
  2. Shape the dough into a ball then transfer to a lightly greased bowl and cover with a polythene bag or cling film, but make sure that they are oiled to prevent the dough from sticking. Leave it in a warm place until it has doubled in size. The rising time usually takes one or two hours.
  3. When the rising time is up, pick up the dough and put it on a lightly floured surface. Punch it to get rid of the excess air, then knead again for about 3-4 minutes, alternatively, let the mixer do the kneading for 2 minutes.
  4. Divide the dough into 8-9 equal balls. On a lightly floured surface, roll out with a lightly dusted rolling pin each ball to 16cm/ 6½ inches circle, 3-4mm/ 1/8 inch thick. Alternatively, you can make nicely shaped circles by using large cutters. Place the dough circles on the prepared baking parchment papers, cover and let them rest for another 20 minutes. Meanwhile, pre-heat the oven to 230 ºC/ 450ºF, heating up at the same time the baking sheets. When the resting time is up and ready to bake, slide the dough circles with their baking parchment onto the hot baking sheets, you may need to do them in batches. You have to be quick when you open the oven, as it is very important to maintain the same temperature all the time.
  5. Bake for 4-8 minutes until they puff up like an inflated balloon, the colour should be lightly golden.
  6. Transfer to a wire rack to cool slightly but, do not stack the baked ones on top of each other, until they are cool. If you are not consuming all the bread at once, you can keep the rest in the fridge for a couple of days or freeze it.   

Nothing is more satisfying than a homely made Hommous bi Tahineh. Although tins of chickpeas are cheap and widely available, the Lebanese in general prefer to prepare it from scratch, the reason is that we think that the freshly cooked chickpeas are much softer and their juices are much tastier, that in turn affects the whole texture of the dip.      

I find that the quality of tahini has an impact on the overall taste. Selecting a good one, though you pay a little more it is worth it. Please shake well or stir with a spoon before use because the paste tends to solidify at the bottom and you might end up with a very thin layer on top and lumps at the bottom.

In addition to its classification as a dip, Hommous bi Tahineh makes a good accompaniment to all grilled or barbecued meat including fish. Some cooks like to add a little yoghurt to the mixture which in turn enhances the lemony flavour and makes it smoother.


Ingredients


  • 200g / 7oz dried chickpeas soaked overnight in water 3 times their volume adding 1tsp bicarbonate of soda.
  • 175 ml/ 6 fl oz of tahini
  • About 100 ml / 3½ fl oz lemon juice or to taste
  • 5 – 6 fat cloves of garlic peeled and crushed to a paste
  • Salt
  • 2 tbsp yoghurt (optional)
  • To garnish 1 tbsp of freshly chopped parsley
  • Paprika
  • Extra virgin olive oil
  • Lebanese bread or segments of red pepper to serve


Method


  1. Begin by discarding the soaking water, rinse chickpeas thoroughly and tip in a medium-sized pan with a generous quantity of fresh water and boil vigorously for 10 minutes. Remove the white scum that forms on the surface, then reduce to medium heat, cover and keep checking every 20 minutes. Top up with boiling water if necessary. It should take about 45 minutes, depending on the quality of the chickpeas. Basically, they are cooked when tender. If you don’t want to proceed to the next stage, you can keep the cooked chickpeas in their liquid in the fridge for a few days, then all you need to do is reheat before making the dip.
  2. To make the dip: keep about two tablespoons of whole chickpeas for garnish, then tip the rest in a food processor with a little of their liquid, do not discard all the liquid yet.
  3. Add the rest of the ingredients with a little salt. Using a low speed, turn the food processor on, let it run for about 2 minutes then taste, adjust if necessary. Keep repeating the same process, adding the yoghurt if you choose, until you reach the consistency and the taste you think is right. The ideal consistency is one which is not too thick, nor too runny: mayonnaise-like. If it is too thick, you can thin it down with some of the reserved liquid, extra virgin olive oil and yoghurt are also other agents to make the dip smoother. If it is too thin, a little more tahini usually does the trick. 
  4. Place the hommous in two small bowls. Arrange some of the reserved whole chickpeas in a mound in the middle, dotting the rest around with a little parsley. Finish off with a sprinkle of paprika and a drizzle of extra virgin olive oil.
  5. Serve with warm Lebanese bread. If you don’t want bread, dip in with fresh red pepper segments, or any other greens such as spring onions, celery, lettuce and so forth. Hommous bi Tahineh keeps well in the fridge for a couple of days but it is best eaten fresh.  


Tip.

Keeping the cooking juice of the chickpeas is necessary, not only to use later as a thinner agent, but also for other purposes. For instance, if you find the mixture is too lemony or has too much garlic, you can soften it by adding some of the juice, or combined with extra virgin olive oil.

Kibbet Samak or Fish Kibbeh originates from North Lebanon more specifically Tripoli. It is light and could be used as a healthy light meal or a starter. Simple ingredients such as bulgar wheat/ burghul, fresh coriander and a few spices are mixed with the fish to achieve a well balanced flavour. Importantly, the saffron that is added to the filling makes this dish a colourful and tasty one. On the subject of saffron, I was recently watching a programme about it and was amazed by the varieties which are available worldwide in the market but not necessarily of good quality. Here are two websites which I found informative:

http://en.wikipedia.org/wiki/Trade_and_use_of_saffron

http://www.encyclopedia.com/topic/saffron.aspx

Serves 4

Ingredients

For the kibbeh:

  • 450 g/ 1lb white boneless fish, skin removed, cut into chunky pieces. For the fish, I usually go for Haddock, but you can use any other white fish.
  • 1 medium onion finely chopped
  • 100 g/ 4 oz fresh coriander washed, dried and chopped
  • Zest of one lemon
  • 150g/ 5 oz fine brown bulgar wheat or burghul
  • A bowl of slightly salted water

For the filling

  • 3 tbsp olive or vegetable oil + 1 tbsp to drizzle at the end
  • 400 g/ 14 oz onions sliced
  • 65 g/ 2½ oz pine nuts
  • A pinch of saffron strands

Seasoning:

  • salt to taste and ground white pepper
  • Ground cinnamon
  • ½ tsp ground coriander

You also need a baking dish, if round one, the diameter would be roughly 25 cm/ 10 inch, rectangular one: 28 x 20 cm/ 11 x 8 inches and 4.5cm/ 1¾ inch depth

Method

  1. Put the burghul in a sieve and rinse it with cold water a couple of times, then squeeze it with your hands to remove excess water. Transfer to a bowl, season with a little salt and keep it aside.
  2. Rinse the fish (skin removed) under cold tap water, pat dry then cut into chunky pieces, transfer into a food processor then blitz once or twice just enough to break up the chunkiness of the fish.
  3. Next, add the remaining ingredients except the burghul and process until combined, season with salt, a ¼ tsp ground white pepper and a pinch of cinnamon. Lastly, mix in the burghul and process again so the mixture will achieve a smooth kibbeh texture. Check seasoning again and adjust if necessary. Transfer to the fridge and let it rest while preparing the filling.
  4. Heat up the oil in a frying pan and sauté the onions until they are just softened. Stir in a pinch of saffron strands and the pine nuts half way through. Season with ¼ tsp white pepper, ½ tsp ground coriander and salt to taste. Leave to cool before assembling.
  5. Lightly grease the baking dish with vegetable oil.
  6. Divide the kibbeh dough in halves. Take the first half and divide it into 4 balls. Spread them within an equal distance from each other in the baking dish. Flatten each ball to about ½ cm / ¼ inch thickness. When necessary, moisten your hands with water and smooth down the kibbeh so in the end, you have one uniform piece that covers the bottom of the baking dish. Spread the filling evenly all over.
  7. For the top part, divide as before the remaining half. Now, because you need to cover the filling it becomes a little trickier. Dampen your hands with the salted water, take each ball and flatten it between your palms to the same thickness as before and lay it on top of the filling. If it is a rectangular or square baking dish, start from one corner, repeat the same process with all of them until you cover the filling including edges. Again, smooth it together so it is uniform.
  8. Cover and chill in the fridge for 20 minutes so that it cuts better, meanwhile pre-heat the oven to 190°C/ 375°F.
  9. With a table knife, mark 4 quarters on the kibbeh. Starting with the first quarter, draw deep geometrical lines to achieve lozenges or square shapes (about 5 cm / 2 inches). Do likewise with the rest, you may need from time to time to moisten the knife with either water or oil. Finally, make a hole in the middle of the baking dish and drizzle the top layer with olive oil and bake until golden brown, roughly 30 minutes.
  10. Serve hot or at room temperature.

Fish kibbeh goes well with a lettuce lemony salad, hommous or with Taratoor/ tahini sauce (see recipe in Sauces).

Kaa’k el Eid or Easter biscuits are usually made along with the maa’moul the traditional Easter pastry (see recipe in desserts) to give something special to children as well as to involve them in the Easter preparations. It’s a basic recipe, once the dough is done, it would be great fun for children to shape it into rings as I will explain later.

As children, we loved them, now I realise that it is their light texture blended with simple spices that made us and other children favour them.

In this recipe, I used the traditional spices, however, you can make your own variation, for instance, you could substitute mahlab for aniseeds or nutmeg instead of cinnamon.

Makes about 18 (depending on the length and thickness of the rings)

Ingredients.

  • 250 g/ 9 oz flour
  • ¼ tsp ground miskeh (see glossary)
  • ½ tsp ground cinnamon
  • 1 tsp aniseed (alternatively ½ tsp ground mahlab)
  • 100 ml / 3½ fl oz milk
  • 100 g/ 4 oz caster sugar
  • 110 g/ 4¼ oz softened butter
  • ½ tsp easy blend yeast
  • 1 egg yolk added to 2 tbsp milk for glazing
  • 2 tbsp sesame seeds (optional)

Method

  1. Put the milk into a small saucepan, tip in the sugar and warm through to dissolve the sugar. Keep on one side.
  2. Mix the flour, spices and yeast in a bowl or food processor, add the softened butter and rub with either your fingers or the beater until well combined.
  3. Add the sweetened milk to the flour mixture and knead with your hands or the dough hook for a couple of minutes, until you have a smooth paste. Cover with a cling film and let it rest for 2 hours.
  4. Next, pre-heat the oven to 200ºC/ 400ºF. Line one or two baking sheets with baking parchment paper.
  5. Divide the dough into equal walnut size pieces. Now, take one piece, roll it into a strip about 1.25 cm/ ½ inch thick and 10cm/ 4 inches long, bring both ends together to achieve a circle shape, pressing one end on top of the other. Transfer gently onto the baking sheet, do likewise with the rest. Once, you have finished, brush the biscuits with the egg wash, sprinkle, if using, with the sesame seeds and pop them into the preheated oven. Bake until they are a light golden colour, roughly 10 to 12 minutes. Let them cool slightly before transferring them onto a wire rack.
  6. If you are not serving the biscuits immediately, you can store them in an airtight container for up to a week.

I think the taste for this dish comes from using fresh fish stock, (not cubes) to which caramelised onions are added which in turn gives it a special aroma. Sayyadiyeh is usually served with a flavoured tahini sauce which I include in the recipe.

For the main dish, you could use any white firm meaty fish such as cod or haddock.


Serves 4.


Ingredients

For the fish stock.


·         450 g/ 1lb fish trimmings including skin and bones

·         Enough tap water to cover the fish about 1 litre/ 2 pints

·         1 medium onion roughly chopped

·         3 sticks of celery washed and roughly chopped

·         2 carrots washed and roughly chopped

·         Large handful of chopped parsley including stems

·         1 bay leaf

·         Salt and pepper


For the dish


·         Vegetable oil

·         500 g/ 1lb 2 oz  Cod or Haddock fillets or any other firm white fish

·         5 medium onions thinly sliced

·         225 g/ 8 oz rice soaked for half an hour before the cooking

·         ½ tsp of each ground cinnamon and ground coriander

·         1 tsp ground cumin   

·         Salt and freshly milled black pepper

·         A pinch of saffron

·         2 tbsp pine nuts (optional)

·         1 lemon quartered


For the hot tahini sauce


·         200 ml/ 7 fl oz tahini paste

·         200 ml/ 7 fl oz lemon juice

·         200 ml/ 7 fl oz water

·         4 fat cloves of garlic peeled

·         1 tsp ground coriander

·         2 green chillies, or more if you like it hotter, very finely chopped

·         3 tbsp fresh coriander chopped

·         Salt

·         1 tbsp olive oil


Method


To make the stock.


1.    Rinse the fish trimmings and bones then put with the other remaining stock ingredients in a large saucepan, cover with water and using high heat, bring to boil. Remove the scum that forms then lower the heat, cover and let it simmer for 45 minutes, checking from time to time. Let it cool slightly before straining and reserving the stock. You need about 500 ml/ 17 fl oz to cook with. You can freeze any excess stock.   


To prepare the main dish.


2.    Rinse the fish under a cold water tap, pat dry with kitchen paper and lay skin down in a buttered oven proof dish. Sprinkle a little lemon juice and brush the fish generously with vegetable oil, season with salt and pepper. Cover and pop it in a 200°C/ 400°F pre-heated oven, bake for 10-15 minutes, then uncover, brush the top with the juices. On a medium to high setting, grill the fish for 3 minutes to give it a crispy texture. Let it cool before flaking it into chunky pieces. Keep warm.

3.     Heat up about 2 tbsp of vegetable oil in a large to medium frying pan, fry the onions until caramelised, they should turn dark brown but not be burnt. Remove with a slotted spoon and transfer onto a plate layered with a kitchen paper to drain excess oil. Meanwhile, you can soak the rice.

4.     Add half of the caramelised onion to the stock and bring back to the boil then simmer for about 10 minutes. Fish out the onions with a slotted spoon then liquidise and return to the stock. If at that stage, you find the sauce is too thick, thin it down with water. Now, return the mixture to the heat, season with the spices, taste and adjust if necessary.

5.    Drain the rice then transfer into a medium saucepan, stir in a quarter of the chunky fish then add 500 ml / 17 fl oz of the stock, bring to the boil, cover then let it simmer for about 12-15 minutes until the rice has absorbed the liquid and cooked. Next, place the remaining cooked fish on top, cover for about 5 minutes before serving.

6.    While the rice is cooking, grease lightly a small frying pan and toast the pine nuts until golden. 

7.    Transfer the rice-fish mixture onto a serving plate, scatter over the caramelised onions followed by the toasted pine nuts and serve at once with wedges of lemon and the Hot Tahini Sauce on the side.


To prepare the Hot Tahini Sauce.


  1. Mix lemon juice with the tahini paste and gradually add the water with ½ tsp of salt, You’ll have a lumpy paste to start, but don’t worry, keep stirring with the spoon until all the ingredients are thoroughly combined and the sauce has reached a creamy consistency. Taste and adjust if necessary.
  2. Next, sprinkle the garlic with a pinch of salt and ground coriander and crush to a paste.
  3. Heat up the oil in a medium sized saucepan. Stir in the garlic paste along with the fresh coriander and chillies, using a medium heat, cook for 2 minutes then add the tahini sauce, stir the whole mixture to help the flavours to develop. If you notice that the mixture is too thick, you can add some water. When it is about to boil, reduce the heat and simmer gently for five minutes, stirring occasionally. Pour into a heat proof jug and serve at once with the main dish.

Baba Ghannouj or Batinjaan Mutabbal are the names used interchangeably for the same dish. However, the term Batinjaan Mutabbal summarises what it is about. Batinjaan is the Arabic name for aubergine, Mutabbal means flavoured or seasoned with, the aubergine in this instance is grilled giving it that wonderful characteristic flavour which is then enhanced by adding garlic, lemon and tahini paste.

Batinjaan Mutabbal or simply Mutabbal, as we Lebanese often call it, is an integral part of the Lebanese Mezza, but also makes a delicious accompaniment to barbecued meat or fish. Suitable for vegans and vegetarians, most importantly, it is easy to make.

One tip worth mentioning is that when buying aubergines, look for the large, beefy and seedless ones, also, please do not attempt to liquidise the cooked flesh, mash it with a fork to preserve the texture.

Serves 4

Ingredients.

  • 2 large or 3 medium aubergines weighing 800-900g / 2lb approx, it is not a lot, aubergines shrivel during grilling
  • 3-4 fat cloves of garlic peeled
  • 3 tbsp lemon juice
  • 3 tbsp tahini paste

To decorate

  • 3 tbsp pomegranate seeds (the sour ones) or the same amount of chopped flat leaf parsley.
  • Extra virgin olive oil to drizzle

You also need a shallow baking tray lined with aluminium foil.

Method.

  1. Pre-heat the grill medium to high heat.
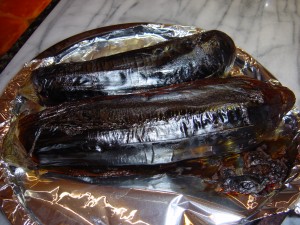
  2. Wash the aubergines as they are (skin on without cutting any stems), then pat dry with a kitchen paper. Take a small sharp knife and make 4 incisions lengthways along the aubergines at 90º to each other, to prevent them from bursting. Place them on the foil covered baking tray and grill them for about 25-30 minutes, turning them every 8 minutes to ensure they are evenly cooked. At the end, we are looking for a blackened charred skin while the inside is soft, you will also notice the excess juices running out (see picture).
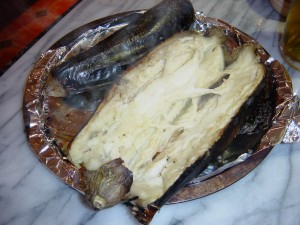
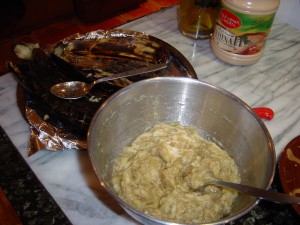
  3. Wait a few minutes for the aubergines to cool down, then cut in half lengthways and pushing aside the skin with the fork (see picture), scoop out the soft inside with a spoon and put it into a colander to drain out excess juice, leave it for about 5 minutes. Meanwhile, in a large mixing bowl, sprinkle salt onto the garlic and crush into a paste, then add the aubergine flesh, mix and using a fork mash gently to obtain a soft but not pureed texture (see picture). Next, stir in the lemon juice, tahini paste and mix thoroughly. Taste and adjust if necessary.
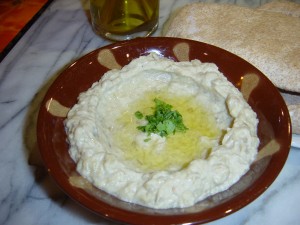
  4. Transfer into 2 shallow serving bowls, fill evenly then make a depression in the middle (see picture). Decorate with the pomegranate seeds or parsley then drizzle extra virgin olive oil. Serve at room temperature with Lebanese or Pitta bread. This is best eaten on the same day but will keep for a couple of days in the fridge.

The grilled aubergines

The grilled aubergines

The inside of the grilled aubergine

The inside of the grilled aubergine

The mashed aubergines

The mashed aubergines

Ready to serve

Ready to serve

Traditionally, when the Christians in Lebanon celebrate Epiphany, they eat and serve different varieties of fritters. Last year, I talked about O’wwamat /Lebanese Doughnuts (see recipe). This time, my recipe is about Ma’croon /Lebanese Fritters with Aniseed.

Ma’croon can be made with flour or semolina or both combined. The main flavouring ingredient is aniseed that gives it a festive aroma. It is very simple to make and is suitable for all eating habits. These are usually deep-fried then dipped straight into the sugar syrup, however, if you don’t like them too sweet, dip and then remove quickly. Ma’croon need the sugar syrup but you can alter the amount by reducing or prolonging the soaking time. I make my Ma’croon with both: flour and semolina because I like that bit of crunchiness created by the semolina. Ma’croon are best eaten when freshly made, like other fritters, they don’t keep for long.

Makes about 25 (roughly 6-7cm / 2½ inches long)

Ingredients

  • 1 quantity of sugar syrup/ Ater (see recipe)
  • 150 g / 5oz fine semolina
  • 75 g/ 3oz flour
  • ¼ tsp easy blend yeast
  • 1 tbsp ground aniseed
  • ¼ tsp Mahlab (optional, see glossary)
  • About 120 ml/ 4fl oz warmish water
  • 3 tbsp vegetable oil to make the dough and enough vegetable oil to deep fry

Method

  1. Sift the flour into a large bowl then add the remaining dry ingredients and mix well. Rub the oil into the mixture, then, gradually add the water mixing and kneading with your hands or dough mixer until you have a firm dough that you can roll. Cover with an oiled clingfilm and leave it at room temperature for an hour. Meanwhile, you could prepare the sugar syrup/ Ater.
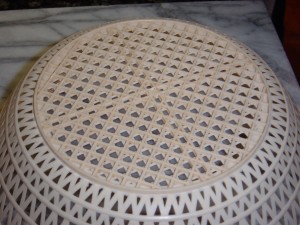
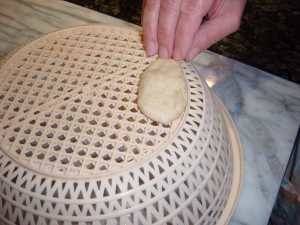
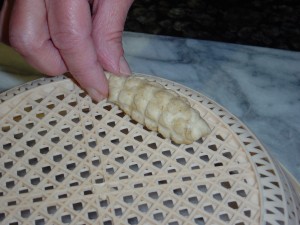
  2. Shape the dough into a long roll (roughly ½ cm diameter) then cut it into pieces, (depending how small or big you want the fritters), the ones in this recipe are about 6 cm / 2½ inches long, therefore, I divided the roll into 25 pieces. Now, take one piece at a time and roll it on a marble or between your hands and give it the shape of a sausage or a plump date. Next, press this down onto a perforated surface like the cheese grater, or a colander with a large mesh (see picture) or any equivalent, to give a dimpled effect. Roll the piece with your fingers towards you so could achieve a dimpled pattern (see picture), place it on the plate and cover with a tea towel to prevent the Ma’croon from drying out, continue likewise with the rest until you finish all the pieces.
    Colander with a suitable mesh

    Colander with a suitable mesh

    Pressing the piece to get the dimpled effect.

    Pressing the piece to get the dimpled effect.

    The dimpled effect.

    The dimpled effect.

  3. Heat up the oil in a deep frying pan and when it is hot enough (enough for a small cube of bread to crisp in 1 minute), drop in as many pieces as the frying pan can safely take, allowing them to float around without being squashed, you may need to do that in batches. Fry, turning the fritters until they are golden, this should take about three or four minutes. Remove with a slotted spoon and drain excess oil by placing them briefly onto kitchen paper, then transfer them while still hot into the pan containing the warm sugar syrup/ Ater. The Ma’croon need the sugar syrup but you can alter the sweetness by reducing or prolonging the soaking time.
  4. Remove from the sugar syrup with a slotted spoon onto a serving plate and eat at once.

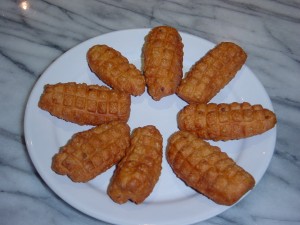
    Ma'croon ready to eat.

    Ma'croon

« Older entries § Newer entries »