Side Dishes

You are currently browsing the archive for the Side Dishes category.

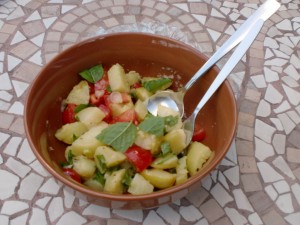
Lebanese Potato Salad, Batata Mtabbaleh maa Hamoud wa Toom is a classic summery dish and can complement any type of barbecued meat or seafood, it is also delicious on its own as a starter.

Lebanese Potato Salad, Batata Mtabbaleh maa Hamoud wa Toom

Lebanese Potato Salad, Batata Mtabbaleh maa Hamoud wa Toom

Serves 4

Ingredients

For the salad

  • 450g/ 1lb potatoes
  • 200g/ 7oz tomatoes washed
  • 3 small spring onions or 1 small red onion
  • 25g/1oz fresh mint, leaves only washed and patted dry

For the dressing

  • 3-4 fat cloves of garlic peeled
  • 4 tbsp lemon juice
  • 6 tbsp extra virgin olive oil
  • Salt to taste & freshly milled black pepper

Method

  1. If using small salad potatoes, you get the best flavour by steaming them. To do that, pour boiling water into a saucepan fitted with a steamer, tip the potatoes into the steamer with one or two sprigs of mint. Cover, and using a medium setting let them steam for 25 minutes or until cooked. You can test them by inserting a skewer in the centre which should feel soft. Discard the mint, then transfer potatoes into a suitable sized-bowl and cover with a clean cloth so it absorbs excess steam, and helps the potatoes to keep a nice texture without getting mushy. This should take roughly 4 minutes, then cut them into halves.
  2. Alternatively if using big potatoes, leave the skin on, rinse them under the tap, then put in a saucepan and cover with water, bring to the boil. Reduce the heat to a medium setting, cover and let them simmer, for nearly 25 minutes or until when inserting a skewer, they feel tender. Drain the potatoes and let them cool down before peeling off the skin. Cut them into bite sized chunky pieces.
  3. To prepare the dressing. Sprinkle a little salt over the garlic and crush to a paste then whisk in the lemon juice and olive oil. Season, taste and adjust if necessary then transfer into the serving bowl.
  4. When you are ready to serve, tip the prepared potatoes into the dressing. Finely, slice the onions then add to the potatoes, chop the tomatoes and tip them including their juice into the mixture. Now, gently mix all the ingredients, taste and adjust if necessary. Roughly, chop the mint and scatter all over the Batata Mtabbaleh maa Hamoud wa Toom salad, serve at once.

I like to serve this Lebanese Potato Salad, Batata Mtabbaleh maa Hamoud wa Toom while still warm, however, it is also delicious served at room temperature or chilled.

Tags: ,

Raw Salmon Kibbeh Salmon Nayyeh or Nayeh

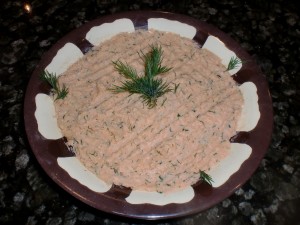
Raw Salmon Kibbeh

If we can eat raw Salmon or Tuna at the Japanese restaurants, why can’t we have them the Lebanese way as Raw Salmon Kibbeh/ Kibbet Salmon Nayyeh or Nayeh? However, and although the title says raw salmon, in fact, it is not because I use the lemon juice which apart from its flavouring element, its acidity also cooks the fish. Raw Salmon Kibbeh is a spin on the traditional Raw Meat Kibbeh called Kibbeh Nayyeh which is an integral part of the mezza.

For this salmon kibbeh, you need fresh fish not defrosted one. I like the taste of salmon or sea trout, but you can experiment with any fish you like and match it with the appropriate herb. Whatever you go for, it makes a tasty appetiser.

Serves 2-3

Ingredients

  • 150g /5oz skinless & boneless fresh Salmon
  • 1 baby onion finely chopped
  • 30g / 1 1/8 oz fine white burghul(cracked wheat)
  • 3 tbsp Lemon juice or to taste
  • 2 tbsp fresh dill chopped
  • Salt to taste & ½ tsp ground white pepper
  • 1 tsp paprika or if you like it hot ¼ tsp cayenne pepper
  • 20g / ¾oz raw pine nuts (optional)
  • Extra virgin olive oil (optional)

Equipment: mincer or food processor

Method

  1. Rinse the white burghul then squeeze dry, keep aside.
  2. Chop the salmon, put into a food processor (or mincer) along with the lemon juice and process until finely minced. Add in the chopped onion together with the burghul, seasoning and process to mix all the ingredients to a smooth paste, taste and adjust if necessary. Finally, stir in the dill, process briefly and it is ready.
  3. Transfer the salmon kibbeh onto a serving plate and flatten it. Use a fork to make decorative dentations. Scatter the pine nuts over then trickle a little oil. Serve immediately.
  4. Serving suggestions: Toasted Lebanese bread, or trimmed spring onions go nicely with Raw Salmon Kibbeh.
Roasted Vegetables and Green Wheat Freekeh Salad

Roasted green wheat freekeh (also known as freeka, frikeh or farik) is rarely used in western cooking although it is one of the oldest food ingredients in the world. The story goes that roughly 2000 years ago when towns and cities used to fight each other frequently, an eastern Mediterranean city was threatened with being besieged. Fearing to die of starvation, the people of that city picked all the wheat while it was still green and stored it. Unfortunately, it caught fire and was burnt. However, out of desperation, they tried to salvage what they could. To their surprise, they discovered as they rubbed off the burnt external skin, that the wheat itself remained intact and edible, they called it farik (later freekeh or freeka) which meant in their spoken Aramaic language the rubbed one. Ever since, roasted green wheat freekeh has become a valuable grain for cooking in the Eastern Mediterranean and North African countries.

The old method of preparation of roasted green wheat freekeh is that once the young wheat stalks are harvested, they are stacked in bunches and dried in the sun, then roasted in the field over an open fire. The aim is to burn off the bristles and the kernel’s outer skin or husk, the moisture within the young grain will protect it from burning while the process endows it with a distinctive smoky flavour. When the roasted wheat has cooled, the grains are shelled by hand, dried again but this time away from the sun, then they are either kept whole or cracked. In fact, some farmers in rural parts of the Levant still use this method. Of course, modern technology had inspired farmers and enthusiasts to develop new techniques to prepare freekeh faster, efficiently and in bigger quantities, like the Greenwheat Freekeh Company.

Freekeh or freeka is very nutritious. Scientific research has proven that green wheat retains more vitamins, fibres and proteins than any other grains. In fact, this link  describes the benefits of freekeh, providing detailed tables of the green wheat contents.

The next link to a youtube video gives you an idea how roasted green wheat freekeh is processed by modern farming

Most importantly, freekeh has a distinctive smoky and nutty taste and it is versatile, it can be cooked as a side dish or as a main course. We Lebanese use it mostly in salads and with meat, while neighbouring countries as well as North African ones have their own signature dish, most of their recipes including the Lebanese ones are on the internet.

Here are my own versions for a salad suitable for all seasons and a heart warming soup.

Roasted Vegetables & Green Wheat Freekeh Salad,

Freeka maa al Khoudra

This roasted green wheat freekeh salad is quite sustaining especially if you are a vegan, as well as that, it goes well with barbecued or grilled meat it can be eaten warm or cold, either way it is quite tasty. It is also ideal for picnics or packed lunches.
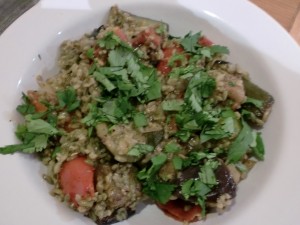
Roasted Vegetables and Green Wheat Freekeh Salad

Roasted Vegetables and Green Wheat Freekeh Salad

For this recipe I used coarse cracked freekeh (freeka), but you can substitute it with a whole grain one which might take a little longer to cook.

Serves 4-6

Ingredients

For the freekeh (freeka)

  • roasted green wheat freekeh (freeka) 1¼ cups
  • 2½ cups water
  • 2 tbsp Olive oil
  • 1 large onion finely chopped
  • Pinch of salt
  • 1 tsp cayenne pepper
  • 2 tsp dried mint

Dressing    

  • 3 or 4 tbsp lemon juice
  • 3 tbsp extra virgin olive oil
  • Salt to taste & freshly milled black pepper
  • About 30 g/1 ¼ oz fresh coriander, rough stalks discarded the rest is washed, dried then chopped

For the roasted vegetables

  • 1 aubergine about 400g / 14oz washed.
  • 450g / 1 lb juicy tomatoes washed then quartered
  • 2 medium courgettes washed then cut into 3 cm / 1¼ inch chunks
  • 2 medium onions peeled then quartered
  • 1 each red and yellow peppers quartered seeds removed
  • 1 tsp dried mint

For the garlic sauce

  • 3 cloves of garlic peeled
  • 4 tbsp olive oil
  • Salt & freshly milled black pepper

Equipment: 1 non-stick baking tray measuring about 30 cm x 22 cm (12 inches x 9 inches) and one non-stick medium sized saucepan.

Method

Preparing the vegetables
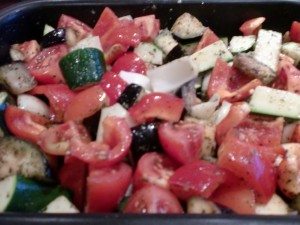
Preparing to roast the vegatables for the freekeh salad

Preparing to roast the vegatables for the freekeh salad

  1. I like to drain the excess bitter juice from the aubergine, it helps to roast better and to absorb other flavours, but it can work without it. With the skin on, cut the aubergine into 3 cm / 1¼ inch chunks then sprinkle over about 1 tsp salt and mix. Transfer into a colander, fit on top a suitable plate on which you place a heavy weight such as tins of tomatoes and leave for an hour to drain away some of the bitter juice. Next, rinse under a tap of cold water then dry thoroughly with a kitchen paper.
  2. When you are ready to cook, pre-heat the oven (fan oven) to 210°C / 450°F.
  3. To make the garlic sauce. Crush the garlic to a paste then add the olive oil, season, and mix well.
  4. Now, arrange the chopped vegetables in the baking tin, sprinkle over the dried mint and mix. Next, drizzle over with the garlic sauce and toss in the vegetables so they are well coated, season again with salt and pepper and give it a good stir. Pop it in the oven for about 30-40 minutes or until the vegetables start to brown round the edges.

To prepare the roasted green wheat freekeh

  1. Pre-packed freekeh is usually clean. If you have purchased it loose, it may contain some dirt, tip into a fine sieve and rinse a couple of times under a tap of cold water and drain well.
  2. Using a medium heat setting, heat the oil in the saucepan then tip in the chopped onion and cook for about 3 minutes. Next, add the freekeh (freeka) and sauté the mixture until all the grains are coated with oil, then pour in the water, add a pinch of salt, cayenne pepper and bring to the boil. Reduce the heat slightly, stir in the dried mint and simmer for about 20-25 minutes by which time the water should have been absorbed while the mixture remains moist and the grains have softened. It is worth checking the mixture when simmering, so if it is cooking dry, top it up with a little more boiling water. If using whole grain freekeh (freeka), increase the amount of water by roughly 85 ml/ 3 fl oz and simmer for a longer time. Once the freekeh (freeka) mixture is cooked, let it stand covered for 5 minutes before assembling the salad.

Assembling the salad.

  1. Tip the cooked freekeh (freeka) over the roasted vegetables, so the roasted green wheat freekeh would absorb all the juices and gently fork it in, adding the chopped coriander and drizzling along the dressing, so all the flavours mingle together. Transfer into a large salad bowl and serve.

Tags: , , , , ,

Nothing is more satisfying than a homely made Hommous bi Tahineh. Although tins of chickpeas are cheap and widely available, the Lebanese in general prefer to prepare it from scratch, the reason is that we think that the freshly cooked chickpeas are much softer and their juices are much tastier, that in turn affects the whole texture of the dip.      

I find that the quality of tahini has an impact on the overall taste. Selecting a good one, though you pay a little more it is worth it. Please shake well or stir with a spoon before use because the paste tends to solidify at the bottom and you might end up with a very thin layer on top and lumps at the bottom.

In addition to its classification as a dip, Hommous bi Tahineh makes a good accompaniment to all grilled or barbecued meat including fish. Some cooks like to add a little yoghurt to the mixture which in turn enhances the lemony flavour and makes it smoother.


Ingredients


  • 200g / 7oz dried chickpeas soaked overnight in water 3 times their volume adding 1tsp bicarbonate of soda.
  • 175 ml/ 6 fl oz of tahini
  • About 100 ml / 3½ fl oz lemon juice or to taste
  • 5 – 6 fat cloves of garlic peeled and crushed to a paste
  • Salt
  • 2 tbsp yoghurt (optional)
  • To garnish 1 tbsp of freshly chopped parsley
  • Paprika
  • Extra virgin olive oil
  • Lebanese bread or segments of red pepper to serve


Method


  1. Begin by discarding the soaking water, rinse chickpeas thoroughly and tip in a medium-sized pan with a generous quantity of fresh water and boil vigorously for 10 minutes. Remove the white scum that forms on the surface, then reduce to medium heat, cover and keep checking every 20 minutes. Top up with boiling water if necessary. It should take about 45 minutes, depending on the quality of the chickpeas. Basically, they are cooked when tender. If you don’t want to proceed to the next stage, you can keep the cooked chickpeas in their liquid in the fridge for a few days, then all you need to do is reheat before making the dip.
  2. To make the dip: keep about two tablespoons of whole chickpeas for garnish, then tip the rest in a food processor with a little of their liquid, do not discard all the liquid yet.
  3. Add the rest of the ingredients with a little salt. Using a low speed, turn the food processor on, let it run for about 2 minutes then taste, adjust if necessary. Keep repeating the same process, adding the yoghurt if you choose, until you reach the consistency and the taste you think is right. The ideal consistency is one which is not too thick, nor too runny: mayonnaise-like. If it is too thick, you can thin it down with some of the reserved liquid, extra virgin olive oil and yoghurt are also other agents to make the dip smoother. If it is too thin, a little more tahini usually does the trick. 
  4. Place the hommous in two small bowls. Arrange some of the reserved whole chickpeas in a mound in the middle, dotting the rest around with a little parsley. Finish off with a sprinkle of paprika and a drizzle of extra virgin olive oil.
  5. Serve with warm Lebanese bread. If you don’t want bread, dip in with fresh red pepper segments, or any other greens such as spring onions, celery, lettuce and so forth. Hommous bi Tahineh keeps well in the fridge for a couple of days but it is best eaten fresh.  


Tip.

Keeping the cooking juice of the chickpeas is necessary, not only to use later as a thinner agent, but also for other purposes. For instance, if you find the mixture is too lemony or has too much garlic, you can soften it by adding some of the juice, or combined with extra virgin olive oil.

Baba Ghannouj or Batinjaan Mutabbal are the names used interchangeably for the same dish. However, the term Batinjaan Mutabbal summarises what it is about. Batinjaan is the Arabic name for aubergine, Mutabbal means flavoured or seasoned with, the aubergine in this instance is grilled giving it that wonderful characteristic flavour which is then enhanced by adding garlic, lemon and tahini paste.

Batinjaan Mutabbal or simply Mutabbal, as we Lebanese often call it, is an integral part of the Lebanese Mezza, but also makes a delicious accompaniment to barbecued meat or fish. Suitable for vegans and vegetarians, most importantly, it is easy to make.

One tip worth mentioning is that when buying aubergines, look for the large, beefy and seedless ones, also, please do not attempt to liquidise the cooked flesh, mash it with a fork to preserve the texture.

Serves 4

Ingredients.

  • 2 large or 3 medium aubergines weighing 800-900g / 2lb approx, it is not a lot, aubergines shrivel during grilling
  • 3-4 fat cloves of garlic peeled
  • 3 tbsp lemon juice
  • 3 tbsp tahini paste

To decorate

  • 3 tbsp pomegranate seeds (the sour ones) or the same amount of chopped flat leaf parsley.
  • Extra virgin olive oil to drizzle

You also need a shallow baking tray lined with aluminium foil.

Method.

  1. Pre-heat the grill medium to high heat.
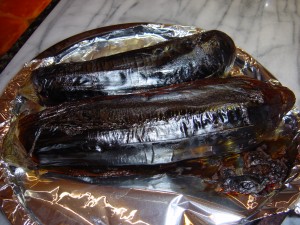
  2. Wash the aubergines as they are (skin on without cutting any stems), then pat dry with a kitchen paper. Take a small sharp knife and make 4 incisions lengthways along the aubergines at 90º to each other, to prevent them from bursting. Place them on the foil covered baking tray and grill them for about 25-30 minutes, turning them every 8 minutes to ensure they are evenly cooked. At the end, we are looking for a blackened charred skin while the inside is soft, you will also notice the excess juices running out (see picture).
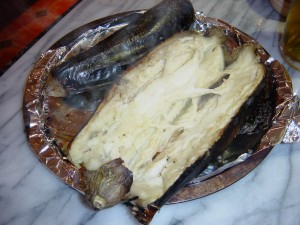
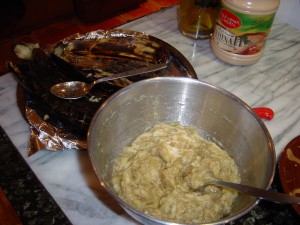
  3. Wait a few minutes for the aubergines to cool down, then cut in half lengthways and pushing aside the skin with the fork (see picture), scoop out the soft inside with a spoon and put it into a colander to drain out excess juice, leave it for about 5 minutes. Meanwhile, in a large mixing bowl, sprinkle salt onto the garlic and crush into a paste, then add the aubergine flesh, mix and using a fork mash gently to obtain a soft but not pureed texture (see picture). Next, stir in the lemon juice, tahini paste and mix thoroughly. Taste and adjust if necessary.
  4. Transfer into 2 shallow serving bowls, fill evenly then make a depression in the middle (see picture). Decorate with the pomegranate seeds or parsley then drizzle extra virgin olive oil. Serve at room temperature with Lebanese or Pitta bread. This is best eaten on the same day but will keep for a couple of days in the fridge.

The grilled aubergines

The grilled aubergines

The inside of the grilled aubergine

The inside of the grilled aubergine

The mashed aubergines

The mashed aubergines

Ready to serve

Ready to serve

The Lebanese way of cooking cauliflower is varied and my two recipes reflect that. The first one Arnabeet Me’ li (Fried Cauliflower) is the most popular, very simple, it consists of frying the cauliflower florets and serve it with taratoor/ tahini sauce (see Sauces section).


The second one Arnabeet Matboukh ma’ Kuzbara (Cauliflower with Coriander) is also easy, the florets are cooked in a very light sauce, finishing off with chopped coriander that complements the flavour of the cauliflower.

If you like to read more on cauliflower, here is a suggested website:

http://www.whfoods.com/genpage.php?tname=foodspice&dbid=13

Some cooks blanch the florets for a couple of minutes before frying them, I don’t, because I think that blanching gives the cauliflower a mushy texture. The heat should be on a medium setting to allow the florets to cook thoroughly. You can serve it as a starter or as a light lunch, preferably hot or warm, at room temperature, whichever you choose, eat it within the day when it is at its best.


Serves 4.


Ingredients


  • 1 kg/ 2 lb cauliflower, discard the tough stalks then cut into smallish florets
  •  Enough vegetable oil to generously cover the bottom of the frying pan
  • Taratoor/ tahini sauce (See recipe in Sauces)


Method


  1. Using a medium setting, heat up the oil in a frying pan.
  2. Fry the cauliflower florets, turning them from time to time until they turn deep golden brownish colour, you know they are cooked when you can easily prick them with a fork. Drain on a kitchen paper to get rid of the excess oil.

Serve with hot bread and tahini sauce. If you don’t like using sauce, sprinkle freshly milled salt and black pepper on the cooked cauliflower and eat it with bread and spring onions.  

You can adjust the spiciness to your liking. It is colourful, easy to make and you can prepare it ahead of time. Above all, it makes a delicious accompaniment to any meal, vegetarian, vegan or meat and can simply be eaten on its own or as a starter. I normally go for small salad potatoes because there are faster to prepare, no need to peel them and when it comes to dicing: just cut them in half.


Serves 4


Ingredients


  • 550g / 1¼ lb potatoes scrubbed but skins left on.
  • 1 chilli or 2 if you like it hotter, finely chopped
  • 25g/ 1oz of fresh coriander, tough stalks discarded, the rest washed, pat dried and chopped.


For the dressing

  • 4 fat cloves of garlic peeled
  • 5 tbsp extra virgin olive oil
  • 2 tbsp lemon  juice


  • Seasoning: salt & freshly milled black pepper


Method


  1. If using small salad potatoes, get the best flavour by steaming them. To do that, pour boiling water into a saucepan fitted with a steamer, tip the potatoes into the steamer with one or two sprigs of mint. Cover, and using a medium setting let them steam for 25 minutes or until cooked. You can test them by inserting a skewer in the centre which should feel soft. Discard the mint, then transfer potatoes into a suitable sized-bowl and cover with a clean cloth so it absorbs excess steam, and helps the potatoes to keep a nice texture without getting mushy. This should take roughly 4 minutes, then cut them into halves.
  2. If using big potatoes, rinse them under the tap, then put in a saucepan and cover with water, add 1tsp of salt and bring to boil. Reduce the heat to a medium setting, cover and let them simmer, for nearly 25 minutes or until when inserting a skewer, they feel tender. Drain the potatoes and let them cool down before peeling off the skin. Cut them into bite sized chunky pieces.
  3. You can prepare the dressing while the potatoes are cooking. Sprinkle some salt onto the peeled garlic and smash into a smooth paste. Add 3 tbsp olive oil, season with freshly milled black pepper and mix thoroughly.
  4. When you are ready to serve, heat up the remaining olive oil in a suitable sized saucepan and throw in the chopped chillies, stir fry for 30 seconds then add the prepared potatoes, followed by the garlic-olive oil mixture. Toss the potatoes around so they absorb the flavour of the ingredients and are re-heated. Stir in the chopped coriander, give the whole thing a good stir, add lemon juice and toss briefly. Take it off the heat, taste and adjust if necessary.

Transfer to a salad bowl and serve at once. However, it is also delicious served at room temperature or even cold.

Mhammarah, literally means reddened, in this context, it refers to mixing hot red chillies with walnuts. Pomegranate syrup is added to sooth down the fiery effect of the chillies. Suitable for vegans and everybody else, this recipe is very basic and works well as an appetiser (mezza) before barbecues, while hanging around and sipping chilled drinks like beer or white wine. The other good thing about this dip is that you can prepare it well ahead of time, which in fact helps the flavours to develop.

Traditionally walnuts are the main ingredients, but you can vary by substituting a quarter of the quantity with pine nuts.

Serves 4

Ingredients.

  • 100 g / 4oz walnuts.
  • 1 or 2 red hot chillies (depending how hot you prefer it) finely chopped
  • 4 tbsp extra virgin olive oil
  • 1 tbsp pomegranate molasses
  • Lemon juice to taste
  • Salt to taste

Method

  1. Grind the walnuts to a paste or until relatively fine (if you like a bit of crunchiness), then tip into the serving bowl.
  2. Add the remaining ingredients and mix well with the spoon. Taste and adjust seasoning if necessary. Keep it in the fridge if you are not eating immediately.
  3. Serve with Lebanese bread, fresh crusty bread also goes well too.

It looks like cream cheese but in fact is strained yoghurt, the better quality the yoghurt, the better taste you get. Although Labneh is one of the traditional Lebanese breakfast dishes, it is becoming more and more popular as part of the mezza. When I took my visiting Irish friends to a Lebanese restaurant they liked it so much that they asked for the recipe which gave me the idea to include it in this section. It is very easy to make and not time consuming at all, though you need to prepare it the night before.

Serves 4-6

Ingredients.

  • 500g/ 1lb 2oz tub of good quality yoghurt (usually called Greek Yoghurt)
  • About 1tsp salt
  • 2 large fat cloves of garlic.
  • Leaves of 1 small sprig of mint. Alternatively ½ tsp of dried mint
  • 1 fat black olive for garnish
  • Extra virgin olive oil to drizzle.

You also need a cotton bag (such as a white pillowcase) in order to drain the mixture overnight

Method.

  1. Mix yoghurt with salt then tip it into the bag. Tie the bag and hang over a bowl or on the tap over the sink, so all the excess liquid is drained which usually takes about 12 hours. You should end up with the consistency of cream cheese.
  2. Transfer the strained yoghurt into a bowl scrapping off all the sticky bits. It should be smooth and spreadable, like a clotted cream. If you think it is too stiff add a little water, taste and adjust if necessary. Keep in the fridge
  3. When you are ready to serve, peel and smash the garlic to a paste then mix with the labneh adding the dried mint if you prefer. Transfer to a serving dish. Decorate with the black olive in the middle, if using the fresh mint chop it up and sprinkle over, finish off with a drizzle of extra virgin olive oil.
  4. Serve with Lebanese bread, try it also toasted.

« Older entries