Starters

You are currently browsing the archive for the Starters category.

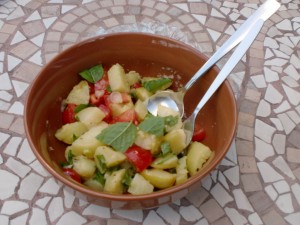
Lebanese Potato Salad, Batata Mtabbaleh maa Hamoud wa Toom is a classic summery dish and can complement any type of barbecued meat or seafood, it is also delicious on its own as a starter.

Lebanese Potato Salad, Batata Mtabbaleh maa Hamoud wa Toom

Lebanese Potato Salad, Batata Mtabbaleh maa Hamoud wa Toom

Serves 4

Ingredients

For the salad

  • 450g/ 1lb potatoes
  • 200g/ 7oz tomatoes washed
  • 3 small spring onions or 1 small red onion
  • 25g/1oz fresh mint, leaves only washed and patted dry

For the dressing

  • 3-4 fat cloves of garlic peeled
  • 4 tbsp lemon juice
  • 6 tbsp extra virgin olive oil
  • Salt to taste & freshly milled black pepper

Method

  1. If using small salad potatoes, you get the best flavour by steaming them. To do that, pour boiling water into a saucepan fitted with a steamer, tip the potatoes into the steamer with one or two sprigs of mint. Cover, and using a medium setting let them steam for 25 minutes or until cooked. You can test them by inserting a skewer in the centre which should feel soft. Discard the mint, then transfer potatoes into a suitable sized-bowl and cover with a clean cloth so it absorbs excess steam, and helps the potatoes to keep a nice texture without getting mushy. This should take roughly 4 minutes, then cut them into halves.
  2. Alternatively if using big potatoes, leave the skin on, rinse them under the tap, then put in a saucepan and cover with water, bring to the boil. Reduce the heat to a medium setting, cover and let them simmer, for nearly 25 minutes or until when inserting a skewer, they feel tender. Drain the potatoes and let them cool down before peeling off the skin. Cut them into bite sized chunky pieces.
  3. To prepare the dressing. Sprinkle a little salt over the garlic and crush to a paste then whisk in the lemon juice and olive oil. Season, taste and adjust if necessary then transfer into the serving bowl.
  4. When you are ready to serve, tip the prepared potatoes into the dressing. Finely, slice the onions then add to the potatoes, chop the tomatoes and tip them including their juice into the mixture. Now, gently mix all the ingredients, taste and adjust if necessary. Roughly, chop the mint and scatter all over the Batata Mtabbaleh maa Hamoud wa Toom salad, serve at once.

I like to serve this Lebanese Potato Salad, Batata Mtabbaleh maa Hamoud wa Toom while still warm, however, it is also delicious served at room temperature or chilled.

Tags: ,

Raw Salmon Kibbeh Salmon Nayyeh or Nayeh

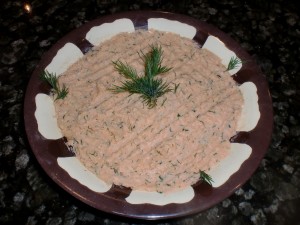
Raw Salmon Kibbeh

If we can eat raw Salmon or Tuna at the Japanese restaurants, why can’t we have them the Lebanese way as Raw Salmon Kibbeh/ Kibbet Salmon Nayyeh or Nayeh? However, and although the title says raw salmon, in fact, it is not because I use the lemon juice which apart from its flavouring element, its acidity also cooks the fish. Raw Salmon Kibbeh is a spin on the traditional Raw Meat Kibbeh called Kibbeh Nayyeh which is an integral part of the mezza.

For this salmon kibbeh, you need fresh fish not defrosted one. I like the taste of salmon or sea trout, but you can experiment with any fish you like and match it with the appropriate herb. Whatever you go for, it makes a tasty appetiser.

Serves 2-3

Ingredients

  • 150g /5oz skinless & boneless fresh Salmon
  • 1 baby onion finely chopped
  • 30g / 1 1/8 oz fine white burghul(cracked wheat)
  • 3 tbsp Lemon juice or to taste
  • 2 tbsp fresh dill chopped
  • Salt to taste & ½ tsp ground white pepper
  • 1 tsp paprika or if you like it hot ¼ tsp cayenne pepper
  • 20g / ¾oz raw pine nuts (optional)
  • Extra virgin olive oil (optional)

Equipment: mincer or food processor

Method

  1. Rinse the white burghul then squeeze dry, keep aside.
  2. Chop the salmon, put into a food processor (or mincer) along with the lemon juice and process until finely minced. Add in the chopped onion together with the burghul, seasoning and process to mix all the ingredients to a smooth paste, taste and adjust if necessary. Finally, stir in the dill, process briefly and it is ready.
  3. Transfer the salmon kibbeh onto a serving plate and flatten it. Use a fork to make decorative dentations. Scatter the pine nuts over then trickle a little oil. Serve immediately.
  4. Serving suggestions: Toasted Lebanese bread, or trimmed spring onions go nicely with Raw Salmon Kibbeh.
Tomato Soup with Freekeh Shorbet Banadoura maa Freekeh

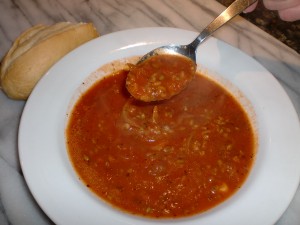
This tasty Freekeh Tomato Soup, Shorbet Banadoura maa Freekeh is made simpler and quicker by using ingredients usually found in the store cupboard:  tinned chopped tomatoes, stock cubes, freekeh and dried herbs. It is also versatile because both vegetarians and non-vegetarians can cook it as you could use either vegetable stock or beef stock. More effectively, the addition of freekeh gives it that nice nutty flavour which turns it into a warm comfort soup suitable for a wintery evening. 

Tomato Soup with Freekeh Shorbet Banadoura maa Freekeh

Freekeh Tomato Soup, Shorbet Banadoura maa Freekeh

The Freekeh Tomato Soup recipe described below makes two substantial portions. You can always double the quantity of the ingredients if you want more.

Serves 2

Ingredients for Freekeh Tomato Soup, Shorbet Banadoura maa Freekeh

  • 1 tin of chopped tomatoes weighing about 400g / 14 oz
  • 1 tbsp olive oil
  • 1 small to medium onion (about 100g/ 4oz) thinly sliced
  • 3 cloves of garlic sliced
  • 1 tsp dried mint
  • Vegetable or beef stock cubes that will make 450-500ml/ 15 -17 fl oz of stock.
  • 30g / 1¼ oz freekeh whole or cracked: either would do
  • Salt to taste and freshly ground black pepper
  • To garnish (optional), 1or 2 tbsp of freshly chopped herbs such as mint, parsley, coriander, fresh thyme.

Method

  1. I tend to process the chopped tomatoes in the food processor to give the soup a smoother texture, and I do that before cooking. You don’t have to if you don’t want.
  2. Using a medium setting, heat the oil in a medium sized pan then tip in the sliced onions and fry until just softened, a couple of minutes. Stir in the garlic and cook for another minute then pour in the processed or chopped tomatoes, mix in the dried mint followed by the stock. Give the mixture a good stir, increase the heat to bring to the boil, then reduce, cover the pan leaving a little gap and let the mixture simmer for 20 minutes. Meanwhile, soak the freekeh, especially if it is a loose one, to get rid of any dirt.
  3. When the simmering time is over, taste the mixture and season to taste then drain the freekeh and stir it in. Increase the heat briefly to bring the soup to the boil then simmer covered for another 15 minutes or more until the freekeh is cooked to your taste, some people like it with a bit of crunch, others don’t.
  4. Check again the seasoning and adjust if necessary, then serve as it is or sprinkle on top your favourite herb.

Enjoy your Freekeh Tomato Soup, Shorbet Banadoura maa Freekeh.

Tags: , , , , , ,

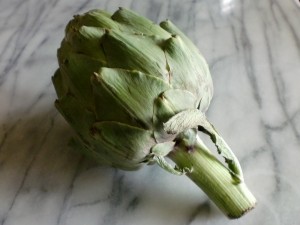
Ardi Choki literally translates the thorn (choki / chawki) from the ground (ard), indicating that this plant belongs to the thistle family. Its initial growth is marked by a pretty purple flower head, while the thorny tips of the leaves is another noticeable thistle characteristic. You will find a good illustration of the Globe Artichoke .

It is worth mentioning that there are three types of artichoke plants which are unrelated: Globe Artichoke, Jerusalem Artichoke and Chinese Artichoke, however, my main focus here is the culinary usage of the Globe Artichoke in our cuisine. The two recipes below demonstrate our simplistic way of cooking artichoke as an appetiser or as a starter.

Artichoke benefits

According to the articles I read, globe artichoke leaves are valued together with the rest of the plant for their health benefits. Apart from their high fibre content and antioxidants, globe artichokes are praised for their properties in:

Cancer prevention

Increasing bile flow

Liver health

Treatment of hangover

Helping digestion

Reducing cholesterol

See also this article on the health benefits of Globe Artichokes.

When buying globe artichoke:

Make sure it is firm with tight fresh green leaves and feels heavy when you hold it.

A raw Globe Artichoke

A raw Globe Artichoke

How to prepare and cook a whole globe artichoke

  1. Place the artichoke on a strong cutting board, remove the toughest outer leaves at the base. Grip the stem and cut off most of it leaving only about 3cm on the artichoke.
  2. Trim the stem with a paring knife, removing any tough fibres surrounding the base. Some cooks prefer to trim off the thorny bit of the top of each leaf, I don’t.
  3. Now rinse the artichoke under a cold water tap.
  4. Next, fill a pan large enough to fit all the artichokes comfortably so they are covered with water, to which you add salt and lemon juice, some cooks prefer to cut a lemon into wedges and throw it in.
  5. Bring to the boil then drop in the prepared artichoke, making sure it is well submerged and let it boil gently uncovered for about half an hour to 40 minutes (depending on the size), or until you can easily pull away an outer leaf.
  6. Once it is cooked, place the artichoke upside down in a colander and drain well.

Globe Artichoke Leaves with Lemon Dressing

Ardi Shawki maa Salsit Hamoud.

This is a very simple and basic recipe that you could use as a tasty appetiser, which is very low in calories. Artichoke can be served warm, at room temperature or even cold as some people prefer. When you eat a whole globe artichoke, watch out for the inedible part called the hairy choke: simply scoop it out and discard.

Serves 4

Ingredients.

  • 4 globe artichokes: allow 1 artichoke per person
  • 1tbsp lemon juice
  • About 1 tsp salt

For the lemon sauce

  • 1 fat clove of garlic peeled
  • 4 tbsp lemon juice
  • 7 tbsp extra virgin olive oil
  • Salt to taste & freshly milled black pepper

Method

  1. Prepare and cook the artichokes as described above.
  2. Smash the garlic to a paste then simply whisk in the remaining ingredients. Taste and adjust if necessary then pour the sauce into two small bowls.
  3. Place the artichokes on individual serving plates along with the sauce bowls and serve.
  4. Take one leaf, dip it into the sauce and eat the tip of it then discard. When you reach the hairy choke that covers the heart or fond, simply remove it with a spoon and discard, then dip the whole heart into the remainder of the sauce and enjoy: it is delicious!
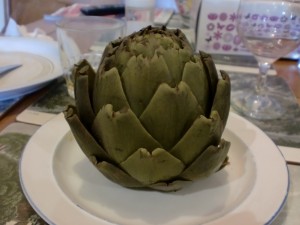
The Globe Artichoke cooked and ready to serve.

The Globe Artichoke cooked and ready to serve.

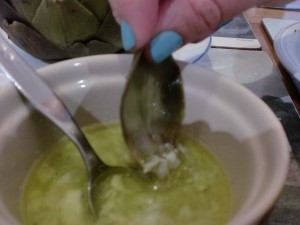
Dip the Artichoke leaf in the sauce then eat the tender part, discarding the tough outer part.

Dip the Artichoke leaf in the sauce then eat the tender part, discarding the tough outer part.

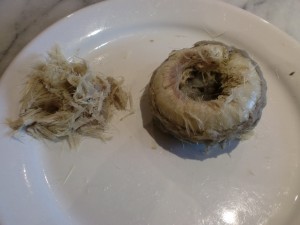
The Hairy Choke still covering the Heart

The Hairy Choke still covering the Heart

The Globe Artichoke heart after removing the Hairy Choke

The Globe Artichoke heart after removing the Hairy Choke

Globe Artichoke & Mushroom Salad/ Salatit Ardi Chawki maa al Fitr

For this recipe, you need artichoke hearts which you can buy tinned, or prepare yourself, nevertheless, you can never beat the flavour of freshly prepared artichoke hearts.

I am not intending to explain how to prepare these artichoke hearts from scratch because there are good video clip demonstrations on the internet like on the following ones:

http://www.bbc.co.uk/food/techniques/preparing_artichokes


As for the mushrooms, I usually go for the chestnut ones because I like their nutty flavour.

Serves 4

Ingredients

4 artichoke hearts

120 g/ 4½ oz chestnut mushrooms, cleaned

1 small onion preferably red

3 tbsp of fresh chopped parsley

As a garnish base: A handful of mixed baby salad leaves such as spinach, beetroot leaves… washed and dried

25g pine nuts toasted (optional)

Dressing

2 fat cloves of garlic peeled

4 tbsp lemon juice

6 tbsp extra virgin olive oil

2 tsp sumac (optional)

Salt to taste & freshly milled black pepper

Method

  1. First cook the mushrooms. Drop the prepared mushrooms into a small pan of simmering water, add a pinch of salt and simmer for 5 minutes. Next, drain the mushrooms and leave in the colander until they are easy to handle then quarter each one and transfer into the salad bowl.
  2. To cook the raw artichoke hearts. Drop the prepared artichoke hearts into a pan of simmering water to which you add salt and 1 tbsp lemon juice, making sure that they are well submerged, top up with more boiling water if necessary. Simmer the for about seven minutes by which time the artichoke hearts should be tender, then tip into a colander to drain. Slice them into chunks then add to the mushrooms
  3. If using tinned artichoke hearts, simply drain them from the brine, cut into chunks and proceed as above.
  4. Thinly slice the onion then tip into the salad bowl along with the chopped parsley.
  5. Whisk all the dressing ingredients, season to taste then tip it over the salad and mix thoroughly. Taste and adjust if needed.
  6. Divide the baby leaves salad between the individual salad plates, top with the dressed salad and scatter the toasted pine nuts over (if you choose to do so). Serve at once.
  7. Toasting pine nuts: wipe a small frying pan with a little oil or butter, tip in the pine nuts and put on a low heat and let the nuts toast keeping a close eye and shaking the pan from time to time until they turn golden. Remove from the heat, transfer onto a small plate, they are ready for use.
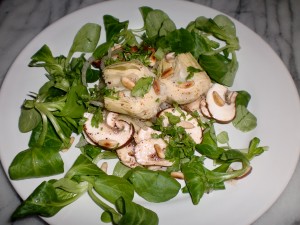
Artichoke and Mushtoom Salad

Artichoke and Mushtoom Salad


Tags: ,

Other spellings: Shanklish, shanklish, shanghlish, shinklish, sorke, or sürke

Shankleesh which is part of the mezza, is a semi-hard cheese with a crumbly texture. How is it made?

Basically, it is a combination of cow’s milk and yoghurt (some cheese-makers also use goat’s milk). The milk is boiled then left to cool slightly before adding to it the yoghurt: each litre/ 1¾ pints of milk requires about 180 ml/ 6 fl oz of natural yoghurt. The mixture is then put on a pot stand, thus allowing the air to circulate evenly and it is left to cool down completely before transferring it into the fridge and keeping it there overnight for twelve hours. The following day, the milk-yoghurt mixture is put on a low heat, stirring it constantly until it reaches boiling point, then it is simmered for a couple of minutes before taking it off the heat. Once it has cooled down, it is strained through a cheese cloth, the remaining curd mixture is then seasoned with salt, pepper and chilli powder. It is then divided into portions which in turn will be shaped into balls approximately the size of a tennis ball. These are then stored in a semi-humid place until they are dry from the outside. Next, each ball is wrapped in greaseproof paper, then placed in a large jar or container and transferred into a cool place: the fridge for instance is considered to be a suitable place.  About two weeks later, they turn brown with the formation of a mould on the outside layer: an indication that the cheese has matured. The mould is then peeled off with a knife and each ball is rolled in dried thyme or oregano, or a mixture of both with chilli flakes added for the extra spicy ones. When this is completed, the shankleesh cheese is ready for use.

Buying Shankleesh: 

The golden rule is always go by recommended brand names. Shops or supermarkets tend to sell mostly the ordinary spicy Shankleesh.

Eating and storing Shankleesh:

Shankleesh does not require any seasoning as it is full of flavours. It keeps well in a glass jar in the fridge.  The longer it is kept, the harder it becomes and the flavour develops. It is also perfect for home freezing.

How the Lebanese eat Shankleesh

I am not writing a recipe as such, but here are some suggestions:

  • Shankleesh has a great affinity for onions and extra virgin olive oil. Finely chop a medium onion, preferably red, then take half of a Shankleesh ball and crumble it on top, drizzle generously with some extra virgin olive oil, mix and serve with Lebanese bread, also fresh crusty baguette goes well with it.
  • You could top up this basic recipe with more ingredients such as a finely chopped tasty tomato with a couple of tablespoons of fresh chopped parsley.
  • To add a perfect finish to scrambled eggs: crumble about 1-2 tbsp over two eggs, just a couple of minutes before they finishing cooking and enjoy with bread and a sliced tomato on the side.
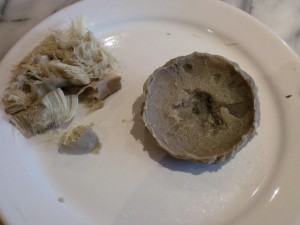
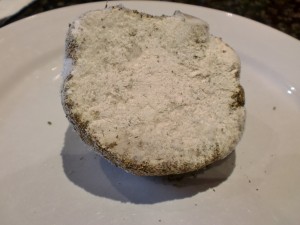
White flaky inside of the Shankleesh

A Shankleesh ball cut in half, This shows the white flaky inside of the Shankleesh.


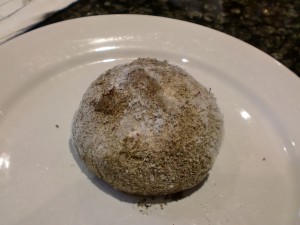
A ball of Shankleesh rolled in herbs as you would buy it

Tags: , , , , ,

Nothing is more satisfying than a homely made Hommous bi Tahineh. Although tins of chickpeas are cheap and widely available, the Lebanese in general prefer to prepare it from scratch, the reason is that we think that the freshly cooked chickpeas are much softer and their juices are much tastier, that in turn affects the whole texture of the dip.      

I find that the quality of tahini has an impact on the overall taste. Selecting a good one, though you pay a little more it is worth it. Please shake well or stir with a spoon before use because the paste tends to solidify at the bottom and you might end up with a very thin layer on top and lumps at the bottom.

In addition to its classification as a dip, Hommous bi Tahineh makes a good accompaniment to all grilled or barbecued meat including fish. Some cooks like to add a little yoghurt to the mixture which in turn enhances the lemony flavour and makes it smoother.


Ingredients


  • 200g / 7oz dried chickpeas soaked overnight in water 3 times their volume adding 1tsp bicarbonate of soda.
  • 175 ml/ 6 fl oz of tahini
  • About 100 ml / 3½ fl oz lemon juice or to taste
  • 5 – 6 fat cloves of garlic peeled and crushed to a paste
  • Salt
  • 2 tbsp yoghurt (optional)
  • To garnish 1 tbsp of freshly chopped parsley
  • Paprika
  • Extra virgin olive oil
  • Lebanese bread or segments of red pepper to serve


Method


  1. Begin by discarding the soaking water, rinse chickpeas thoroughly and tip in a medium-sized pan with a generous quantity of fresh water and boil vigorously for 10 minutes. Remove the white scum that forms on the surface, then reduce to medium heat, cover and keep checking every 20 minutes. Top up with boiling water if necessary. It should take about 45 minutes, depending on the quality of the chickpeas. Basically, they are cooked when tender. If you don’t want to proceed to the next stage, you can keep the cooked chickpeas in their liquid in the fridge for a few days, then all you need to do is reheat before making the dip.
  2. To make the dip: keep about two tablespoons of whole chickpeas for garnish, then tip the rest in a food processor with a little of their liquid, do not discard all the liquid yet.
  3. Add the rest of the ingredients with a little salt. Using a low speed, turn the food processor on, let it run for about 2 minutes then taste, adjust if necessary. Keep repeating the same process, adding the yoghurt if you choose, until you reach the consistency and the taste you think is right. The ideal consistency is one which is not too thick, nor too runny: mayonnaise-like. If it is too thick, you can thin it down with some of the reserved liquid, extra virgin olive oil and yoghurt are also other agents to make the dip smoother. If it is too thin, a little more tahini usually does the trick. 
  4. Place the hommous in two small bowls. Arrange some of the reserved whole chickpeas in a mound in the middle, dotting the rest around with a little parsley. Finish off with a sprinkle of paprika and a drizzle of extra virgin olive oil.
  5. Serve with warm Lebanese bread. If you don’t want bread, dip in with fresh red pepper segments, or any other greens such as spring onions, celery, lettuce and so forth. Hommous bi Tahineh keeps well in the fridge for a couple of days but it is best eaten fresh.  


Tip.

Keeping the cooking juice of the chickpeas is necessary, not only to use later as a thinner agent, but also for other purposes. For instance, if you find the mixture is too lemony or has too much garlic, you can soften it by adding some of the juice, or combined with extra virgin olive oil.

Kibbet Samak or Fish Kibbeh originates from North Lebanon more specifically Tripoli. It is light and could be used as a healthy light meal or a starter. Simple ingredients such as bulgar wheat/ burghul, fresh coriander and a few spices are mixed with the fish to achieve a well balanced flavour. Importantly, the saffron that is added to the filling makes this dish a colourful and tasty one. On the subject of saffron, I was recently watching a programme about it and was amazed by the varieties which are available worldwide in the market but not necessarily of good quality. Here are two websites which I found informative:

http://en.wikipedia.org/wiki/Trade_and_use_of_saffron

http://www.encyclopedia.com/topic/saffron.aspx

Serves 4

Ingredients

For the kibbeh:

  • 450 g/ 1lb white boneless fish, skin removed, cut into chunky pieces. For the fish, I usually go for Haddock, but you can use any other white fish.
  • 1 medium onion finely chopped
  • 100 g/ 4 oz fresh coriander washed, dried and chopped
  • Zest of one lemon
  • 150g/ 5 oz fine brown bulgar wheat or burghul
  • A bowl of slightly salted water

For the filling

  • 3 tbsp olive or vegetable oil + 1 tbsp to drizzle at the end
  • 400 g/ 14 oz onions sliced
  • 65 g/ 2½ oz pine nuts
  • A pinch of saffron strands

Seasoning:

  • salt to taste and ground white pepper
  • Ground cinnamon
  • ½ tsp ground coriander

You also need a baking dish, if round one, the diameter would be roughly 25 cm/ 10 inch, rectangular one: 28 x 20 cm/ 11 x 8 inches and 4.5cm/ 1¾ inch depth

Method

  1. Put the burghul in a sieve and rinse it with cold water a couple of times, then squeeze it with your hands to remove excess water. Transfer to a bowl, season with a little salt and keep it aside.
  2. Rinse the fish (skin removed) under cold tap water, pat dry then cut into chunky pieces, transfer into a food processor then blitz once or twice just enough to break up the chunkiness of the fish.
  3. Next, add the remaining ingredients except the burghul and process until combined, season with salt, a ¼ tsp ground white pepper and a pinch of cinnamon. Lastly, mix in the burghul and process again so the mixture will achieve a smooth kibbeh texture. Check seasoning again and adjust if necessary. Transfer to the fridge and let it rest while preparing the filling.
  4. Heat up the oil in a frying pan and sauté the onions until they are just softened. Stir in a pinch of saffron strands and the pine nuts half way through. Season with ¼ tsp white pepper, ½ tsp ground coriander and salt to taste. Leave to cool before assembling.
  5. Lightly grease the baking dish with vegetable oil.
  6. Divide the kibbeh dough in halves. Take the first half and divide it into 4 balls. Spread them within an equal distance from each other in the baking dish. Flatten each ball to about ½ cm / ¼ inch thickness. When necessary, moisten your hands with water and smooth down the kibbeh so in the end, you have one uniform piece that covers the bottom of the baking dish. Spread the filling evenly all over.
  7. For the top part, divide as before the remaining half. Now, because you need to cover the filling it becomes a little trickier. Dampen your hands with the salted water, take each ball and flatten it between your palms to the same thickness as before and lay it on top of the filling. If it is a rectangular or square baking dish, start from one corner, repeat the same process with all of them until you cover the filling including edges. Again, smooth it together so it is uniform.
  8. Cover and chill in the fridge for 20 minutes so that it cuts better, meanwhile pre-heat the oven to 190°C/ 375°F.
  9. With a table knife, mark 4 quarters on the kibbeh. Starting with the first quarter, draw deep geometrical lines to achieve lozenges or square shapes (about 5 cm / 2 inches). Do likewise with the rest, you may need from time to time to moisten the knife with either water or oil. Finally, make a hole in the middle of the baking dish and drizzle the top layer with olive oil and bake until golden brown, roughly 30 minutes.
  10. Serve hot or at room temperature.

Fish kibbeh goes well with a lettuce lemony salad, hommous or with Taratoor/ tahini sauce (see recipe in Sauces).

Baba Ghannouj or Batinjaan Mutabbal are the names used interchangeably for the same dish. However, the term Batinjaan Mutabbal summarises what it is about. Batinjaan is the Arabic name for aubergine, Mutabbal means flavoured or seasoned with, the aubergine in this instance is grilled giving it that wonderful characteristic flavour which is then enhanced by adding garlic, lemon and tahini paste.

Batinjaan Mutabbal or simply Mutabbal, as we Lebanese often call it, is an integral part of the Lebanese Mezza, but also makes a delicious accompaniment to barbecued meat or fish. Suitable for vegans and vegetarians, most importantly, it is easy to make.

One tip worth mentioning is that when buying aubergines, look for the large, beefy and seedless ones, also, please do not attempt to liquidise the cooked flesh, mash it with a fork to preserve the texture.

Serves 4

Ingredients.

  • 2 large or 3 medium aubergines weighing 800-900g / 2lb approx, it is not a lot, aubergines shrivel during grilling
  • 3-4 fat cloves of garlic peeled
  • 3 tbsp lemon juice
  • 3 tbsp tahini paste

To decorate

  • 3 tbsp pomegranate seeds (the sour ones) or the same amount of chopped flat leaf parsley.
  • Extra virgin olive oil to drizzle

You also need a shallow baking tray lined with aluminium foil.

Method.

  1. Pre-heat the grill medium to high heat.
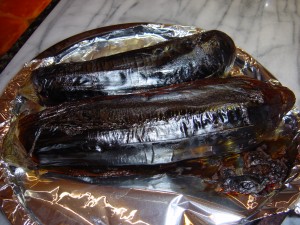
  2. Wash the aubergines as they are (skin on without cutting any stems), then pat dry with a kitchen paper. Take a small sharp knife and make 4 incisions lengthways along the aubergines at 90º to each other, to prevent them from bursting. Place them on the foil covered baking tray and grill them for about 25-30 minutes, turning them every 8 minutes to ensure they are evenly cooked. At the end, we are looking for a blackened charred skin while the inside is soft, you will also notice the excess juices running out (see picture).
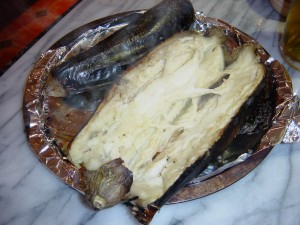
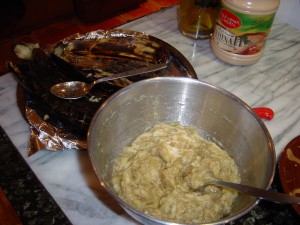
  3. Wait a few minutes for the aubergines to cool down, then cut in half lengthways and pushing aside the skin with the fork (see picture), scoop out the soft inside with a spoon and put it into a colander to drain out excess juice, leave it for about 5 minutes. Meanwhile, in a large mixing bowl, sprinkle salt onto the garlic and crush into a paste, then add the aubergine flesh, mix and using a fork mash gently to obtain a soft but not pureed texture (see picture). Next, stir in the lemon juice, tahini paste and mix thoroughly. Taste and adjust if necessary.
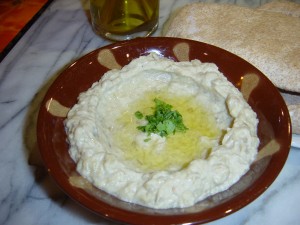
  4. Transfer into 2 shallow serving bowls, fill evenly then make a depression in the middle (see picture). Decorate with the pomegranate seeds or parsley then drizzle extra virgin olive oil. Serve at room temperature with Lebanese or Pitta bread. This is best eaten on the same day but will keep for a couple of days in the fridge.

The grilled aubergines

The grilled aubergines

The inside of the grilled aubergine

The inside of the grilled aubergine

The mashed aubergines

The mashed aubergines

Ready to serve

Ready to serve

With Christmas coming, I thought of the Lebanese savoury pastries as a versatile option. Although they are part of the mezza, they can also be served as canapés because you can make them any size you like and vary the filling. It might sound fiddly and long-winded, but in fact, the pastry is very simple to make, as for the filling, it cannot be easier. Another great advantage is that you can prepare them ahead of time and freeze them until needed.

Traditionally, the fillings are made with cheese, meat, spinach and Swiss chard or herbs. When the filling consists of meat or cheese, the pastry is made into a crescent shape and called Sambusik which could be Sambusik b’Jibneh/ Cheese Crescent or Sambusik b’Lahmeh/ Meat Crescent. As for the pastries with spinach filling or other greens they are called Fatayer like Fatayer b’Sbanegh/ Spinach Triangles which are the most popular or Fatayer b’Sili’ / Swiss chard Triangles.

Ajeenet al-Fatayer wa al-Sambousik

Traditional Savoury Pastry

Ingredients.

· 225g / 8 oz self raising flour

· ¼ tsp salt

· 2 tbsp vegetable or olive oil

· enough tepid water to make soft dough about 100-120ml / 3½ fl oz- 4 fl oz

Method.

  1. In a large bowl, sift the flour and salt, then make a well in the centre. Using the tip of your fingers, rub in the oil. Add the water gradually, while kneading with your hands to form a soft elastic dough. Alternatively, you can make it in the food processor using the dough hook.
  2. Cover with a cloth and let it rest for half an hour at room temperature, then the dough is ready for use.

Sambousik b’Lahmeh (Minced Meat Crescents)

Sambousik are usually deep fried, however, I have tried them baked which works well but, it did not give them that fluffiness that deep frying does. Another bonus with sambousik is that they freeze well but you have to cook them first, and when you need to serve, defrost thoroughly, then simply heat in the oven (fan 180°C / 200°F). The amount of filling required here is sufficient for 1 quantity of Traditional Savoury Pastry. However, if you want to split the dough to try different fillings, then reduce the amount accordingly.

Makes about 23 pieces (using a cutter 8½ cm/ 3½ inches diameter)

Ingredients.

· 1 quantity of Traditional Savoury dough (see recipe)

For the filling

· 10 ml vegetable oil

· 25 g/1 oz pine nuts

· 1 medium onion finely chopped

· 120 g/ 4½ oz minced lamb

· Seasoning: salt to taste, 1 tsp ground allspice, ½ tsp ground black pepper, ¼ tsp cinnamon

· 1 tbsp lemon juice or pomegranate syrup

Method.

  1. Heat up the oil in a medium-sized frying pan using medium heat. Add the onions and cook for 1 minute after which you add the meat. Fry breaking up any lumps with the spoon and cook until the meat is browned.
  2. Meanwhile, wipe with a little bit of oil another small frying pan. Using low to medium heat setting, sauté the pine nuts until golden brown, here, you have to be very watchful because pine nuts can burn easily.
  3. Once the meat is ready, season, stir in the pine nuts and then add the juice. Give the whole thing a good stir. Let it cool, so it is easy to handle.
  4. Sprinkle the working surface with a little flour and keep some flour handy for you will need it during the process. You will also need a table knife. I find the easiest way is to divide the dough into 3 balls and work with each one in turn. Keep the pastry you are not using covered with a cloth or cling film to prevent it from drying out. Take the first ball and with a rolling pin, roll it out into a circle of about 3 mm/ 1/8 inch thickness. Cut into circles of 8½ cm/ 3½ inches diameter which I think is suitable for canapés and for a beginner. If you are more adventurous you can cut them to 7cm/ 3inches. Gather together pastry cuttings, dust with some flour, knead them together, re-roll and cut into other circles until the first batch is finished.
  5. Once you have cut the first batch, place 2 tsp of filling on each circle for medium sized or less depending on the size.
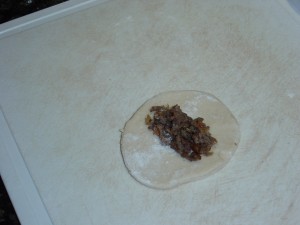
    The meat filling

    The meat filling

    Now fold over the circle into a crescent shape, pinch the edges together and fold twisting so you end up with a pleated firm edge.

    Put each sambousik on a plate sprinkled with a little flour.
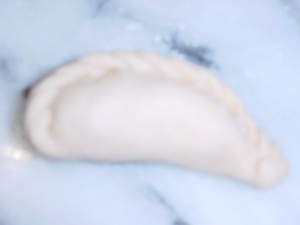
    The finished pleated seam

    The finished pleated seam

    You can deep fry in hot oil but if you want to finish all batches, it is advised to cover the prepared sambousik with lightly oiled cling film.

  6. To deep fry them, heat up the oil in a deep pan, you need enough vegetable oil to generously cover the sambousik, give them enough room to float around and most probably you need to fry them in batches. When the temperature reaches 180°C/ 350°F (enough for a small cube of bread to crisp in 1 minute), place gently sambousik and fry turning once until they are golden. Remove with a slotted spoon and drain excess oil by placing them onto kitchen paper.
  7. If you want to try them baked. Pre-heat a fan oven to 200°C / 400°F place sambousik on a generously greased baking sheet, brush the top with vegetable oil and bake for 10-12minutes until golden then turn them over and bake for another 10 minutes.
  8. Serve hot or warm with wedges of lemon.

Sambousik b’ Jibneh (Cheese Crescents)

You can use any cheese you like, on its own or flavour it with other ingredients if you wish. My family’s favourite is Halloumi which melts beautifully inside the pastry without becoming runny or leaking. Sambousik are usually deep fried, however, you could try them baked. Once cooked, Sambousik freeze well, but you need to defrost them thoroughly then simply reheat in a pre-heated oven 180°C / 350°F for about 5 to 7 minutes.

Makes about 23 pieces (using a cutter 8½ cm/ 3½ inches diameter)

Ingredients.

· 1 quantity of Traditional Savoury Pastry

For the filling.

· About 200 g / 7 oz of Halloumi cheese finely chopped or grated

· enough vegetable oil to deep fry

Method

1. Sprinkle the working surface with a little flour and keep some flour handy for you will need it during the process. You will also need a table knife. I find the easiest way is to divide the dough into 3 balls and work with each one in turn. Keep the pastry you are not using covered with a cloth or cling film to prevent it from drying out. Take the first ball and with a rolling pin, roll it out into a circle of about 3mm / 1/8 inch thickness. Cut into circles of 8½ cm / 3½ inches diameter which I think is suitable for canapés and for a beginner. If you are more adventurous you can cut them to 7cm/ 3inches. Gather together pastry cuttings, dust with some flour, knead them together, re-roll and cut into other circles until the first batch is finished.

2. Once you have cut the first batch, place one circle on a flat surface and put enough filling roughly one full teaspoon and spread it along the middle, leaving the edges untouched. Now fold over the circle into a crescent shape, pinching tightly the edges to seal, once done, twist over the edges so you end up with a firm pleated edge. Put each sambousik on a plate sprinkled with a little flour. You can deep fry in hot oil but it is better to finish all batches. It is advisable to cover the prepared sambousik with lightly oiled cling film until you are ready to cook.

3. To deep fry them, heat up the oil in a deep pan, you need enough vegetable oil to generously cover the sambousik, give them enough room to float around and most probably you need to fry them in batches. When the temperature reaches 180°C/ 350°F (enough for a small cube of bread to crisp in 1 minute), place gently sambousik and fry turning once until they are golden. Remove with a slotted spoon and drain excess oil by placing them onto kitchen paper.

4. If you want to try them baked. Pre-heat fan oven to 200°C/ 400°F, place sambousik on a generously greased baking sheet, brush the top with oil and bake for 10-12minutes or until golden then turn them over and bake for another 10 minutes.

5. Serve hot or warm.

Another variation of filling is Feta cheese. Crumble 125 g/ 4½ oz of Feta cheese and mix with 75 g / 3 oz of Mozzarella finely chopped or grated, add 2 tbsp of dried mint and rub it into the mixture, then follow the same procedure as with the Halloumi cheese.

Fatayer b’ Sbanegh (Spinach Triangles)

These savoury pastries are suitable for vegan and vegetarians. People in Lebanon vary the filling, instead of spinach they use purslane leaves, Swiss chard leaves, dandelion, or any other edible herbs. So these are all alternatives, you can follow the same instructions described below. As mentioned earlier, Spinach Triangles or other herb pastries freeze well, however, you need to defrost thoroughly before reheating them. Another advantage is that you bake rather than deep fry them.

One last thing to mention, please do not use frozen spinach because you cannot get rid of the excess water content which will spoil both the pastry and the taste.

Makes about 15-16 pieces (using a cutter 10 cm / 4 inches diameter)

Ingredients

1 quantity of Traditional Savoury Pastry (see recipe)

For the filling.

· 200g / 7oz spinach, washed, dried and chopped

· 1 tsp salt

· 1 medium onion finely chopped

· ¼ tsp ground black pepper

· ¼ tsp allspice

· 1 tbsp sumac

· 1 tbsp pine nuts (optional)

· 2 tbsp lemon juice or to taste

· 2 tbsp extra virgin olive oil plus extra to brush the filled pastries before baking

Method.

1. Put the spinach in a large mixing bowl, sprinkle with salt and rub with your hands until it wilts then squeeze out the excess water. Do likewise with the onion before adding it to the spinach, season the mixture then add the remaining ingredients. Mix well and taste, adjust if necessary: usually the lemony taste should be obvious. The filling is now ready.

2. As for the pastry, proceed in the same way as with sambousik. However, I think that spinach pastries should be a little bigger than the sambousik ones because the filling is chunkier and actually, you need more of it because spinach does shrink. Roll out the dough to about 3 mm / 1/8 inch thickness and using the cutter, press out circles of 10cm / 4 inches diameter. Place 1 tbsp of the filling in the middle of each circle.
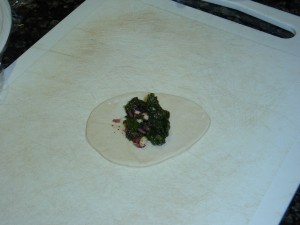
The spinach filling

The spinach filling

To create the triangular pyramid shape, lift 2 sides of the circle, each being one third of the circumference and pinch them together half way down to make a raised seam (keeping the filling intact).
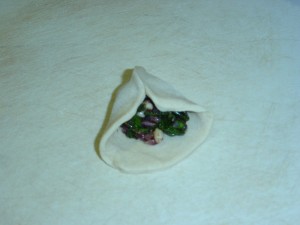
Joining the first two sides

Joining the first two sides

Next, bring the other end to join the two sides creating a triangular pyramid.
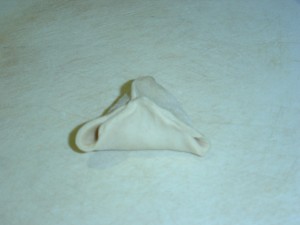
The final fold before sealing

The final fold before sealing

3. Put the filled pastry onto a baking sheet lined with baking parchment and continue until you finish them all. Brush them with oil.
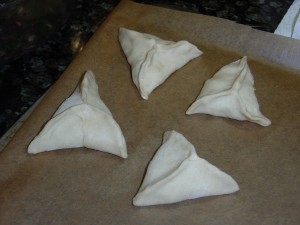
Ready for the oven

Ready for the oven

4. Bake in a pre-heated fan oven at 200°C/ 400°F for 12-15minutes until golden.

5. Serve hot, warm or even cold with wedges of lemon. Whichever way, they are delicious!

The Lebanese way of cooking cauliflower is varied and my two recipes reflect that. The first one Arnabeet Me’ li (Fried Cauliflower) is the most popular, very simple, it consists of frying the cauliflower florets and serve it with taratoor/ tahini sauce (see Sauces section).


The second one Arnabeet Matboukh ma’ Kuzbara (Cauliflower with Coriander) is also easy, the florets are cooked in a very light sauce, finishing off with chopped coriander that complements the flavour of the cauliflower.

If you like to read more on cauliflower, here is a suggested website:

http://www.whfoods.com/genpage.php?tname=foodspice&dbid=13

« Older entries