Vegetarian

You are currently browsing the archive for the Vegetarian category.

Although it is an old dish cooked by country people during Lent, nevertheless, the combination of basic ingredients gives this dish an unexpected earthy delicious taste. It is very easy to prepare and quite sustaining.


Serves 2 as a main course


Ingredients


  • 3 tbsp olive oil
  • 2-3 medium onions thinly sliced
  • 1 tin 400 g / 14 oz Italian chopped tomatoes
  • 500 ml / 17 fl   water or vegetable stock
  • 150 g / 5 oz  coarse bulgar wheat (see glossary)
  • Salt & freshly milled black pepper


Method


  1. Heat up the oil in a medium saucepan, tip in the sliced onions and fry until they turn golden.
  2. Next, stir in the chopped tomatoes, and cook for 2 minutes, then add the water or vegetable stock.
  3. Bring the mixture to the boil, then cover, reduce the heat if necessary and let it simmer for half an hour, by which time the sauce should have reached the right consistency. Season and taste.
  4. Tip in the bulgar wheat, give the whole mixture a good stir, then let it simmer for roughly 10 minutes or until the bulgar wheat has absorbed the sauce but still moist. Switch off the heat and let it stand covered for 5 minutes.
  5. Serve hot on its own or with any green lemony salad.      


An unusual rice pudding because it contains no milk or any other animal products which makes it suitable for vegans. Simple, yet the combination of spices gives it an aromatic taste. The secret as my mother always emphasised is in stirring the pudding. In fact, Meghli in Arabic means thoroughly boiled, which implies that the pudding requires steady boiling and simmering. You have to be patient because you must keep a close eye on it while it is cooking. The good thing is that you could prepare it a day ahead because it can be served either at room temperature or chilled. As for the topping, you could vary this to suit your taste. 


Serves 8


Ingredients


For pudding:


  • 2 litres / 3½ pints of water
  • 150 g / 5 oz ground rice
  • 1 tbsp ground caraway seeds
  • 1 tbsp ground anise seeds
  • 2 tsp ground cinnamon
  • 1 tsp ground fennel
  • 275 g / 10 oz caster sugar


For topping:


  • 100 g / 3½ oz dried shredded coconut
  • A selection of mixed nuts: you need about 75 g / 3 oz of each walnuts, pine nuts and blanched almonds
  • rose petals for decoration (optional)


You also need a large saucepan, preferably non-stick.  


Method


  1. Pour the water into saucepan and tip in the ground rice. Using medium to high heat, bring the mixture to boil stirring constantly. Reduce slightly the heat and add all the spices, continue stirring for about 20 minutes or until you feel that rice and water are thoroughly combined and there are no lumps.
  2. Next, add the sugar and continue stirring. This is the stage where the mixture begins to thicken up, so you can loosen pause your stirring occasionally while watching vigilantly.  It should take about 25 minutes for the pudding to reach the right thickness. You know it is ready when a thick layer coats the back of the spoon.
  3. Once ready, take off the heat. Give the pudding a good stir and ladle it into individual dessert bowls or a large one.
  4. Cool then decorate with shredded coconut, a little red petal jam in the middle and the nuts scattered all over.
  5. NB. If you are allergic to nuts and you would like to try it, have a go without them. It still tastes nice.

This is a relatively fast appetising dish that can be eaten hot, warm or cold and can be used as starter, light lunch or a side dish for it complements meat dishes. Any fresh green beans that are in season will do. I also tried it with fresh Runner Beans and it was delicious. A word of advice, avoid tinned tomatoes because they can spoil the taste, nothing can complement fresh tender beans better than fresh ripe tomatoes.


Serves 4


Ingredients


  • 500 g/ 1lb 2oz green beans any kind available in season
  • 4 tbsp extra virgin olive oil
  • 1 medium onion finely chopped
  • 1 head of garlic: cloves peeled and chopped into chunky pieces
  • 450 g/ 1lb of ripe tomatoes skinned and chopped
  • 1 tbsp tomato puree or less depending on how juicy the tomatoes are
  • Seasoning: salt and freshly milled black pepper


Method


  1. Top, tail, string the beans then cut them into smallish pieces about 5cm / 2 inches, wash them in fresh water and keep aside.
  2. Heat up the oil in a large saucepan over a medium heat, then add the chopped onion and sauté for a couple of minutes, stir in the chopped garlic and cook for another minute.
  3. Add the prepared beans and stir them into the mixture, season with salt and generous freshly milled black pepper, cook for 2 minutes stirring occasionally.
  4. Next, stir in the chopped tomatoes, tomato paste, cover and bring to the boil stirring once or twice then let it simmer for 15-20 minutes, by which time, the beans should be cooked and tomatoes have melted into a nice thick sauce. Taste and adjust seasoning if necessary.
  5. Serve in individual dishes, drizzle more extra virgin olive oil on top and eat with warm bread.

I prefer to use fresh Lebanese green thyme, it has long leaves, bigger than the lemon thyme that is commonly known in England. However, Lebanese thyme is only found in Lebanese stores during spring and summer. This is why I tried it with lemon thyme and it worked. Thyme salad makes an ideal appetiser, regardless of your eating habits, and guess what! It is very easy to make.


Serves 4


Ingredients.


  • 1 bunch weighing 25 g / 1oz of lemon thyme, leaves picked washed and dried on a kitchen paper
  • 1 or 2 spring onions finely chopped
  • 1 tsp lemon juice
  • 3 tbsp extra virgin olive oil
  • Seasoning: salt to taste
  • ½ tsp sumac (optional)


Method.


1        Put thyme leaves and the chopped onions in a small salad bowl. Whisk lemon juice and olive oil, then toss into the thyme mixture. Season, taste and adjust if necessary.

2        Serve with Arabic bread or if you want to add a twist, thinly slice some Ciabatta bread, smear each piece with 1 generous tsp of the salad and enjoy with a well chilled drink.  

The Taro used in this recipe is the root (tuber) brownish one. Rich in calcium and iron, root Taro is an excellent source of energy and fibre. The traditional way we cook it with tahini sauce and chickpeas make it an ideal meal for vegans or non-vegans. This dish can be prepared in advance and re-heated, it also freezes well.
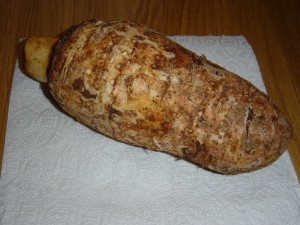
Taro Root (Colocassia)

Taro Root (Colocasia)

If you wish to know more about the benefits of Taro, I included 3 websites at the end of the recipe. 

Which one to buy?

Select a Taro that is firm and has no traces of mould. I normally go for the large ones (weighing about 1 kg / 2¼ lb) because they are creamier and richer than the small ones.

Word of advice

Root Taro contains calcium oxalate, a substance that can irritate both mouth and skin. So never taste the taro raw and preferably wear gloves when peeling raw Taro.

Serves: 2-3

Ingredients

  • 50 g / 2 oz chickpeas soaked overnight in water with ¼ tsp bicarbonate of soda or the same amount of tinned chickpeas
  • 550 g / 1¼ lb  Taro / Colocasia
  • 450 g / 1lb onions peeled and quartered
  • 3 tbsp vegetable oil
  • 300ml/ vegetable stock
  • Salt & freshly milled black pepper

Tahini sauce

  • 2 cloves of garlic peeled and crushed to a paste
  • 85 ml / 3 fl oz     tahini paste
  • 60 ml / 2¼ fl of lemon juice or for a sweet and sour taste, use half orange juice, half lemon juice
  • 100 ml / 3½ fl oz water

Method


1.      If you are starting with the chickpeas you soaked overnight, rinse them under cold water, transfer to a small saucepan, cover generously with water and add ½ tsp salt. Bring to the boil using high heat and removing any scum that forms on the surface. Once you’ve finished, reduce to a medium heat, cover and simmer for roughly 40 minutes, (you know the chickpea is cooked when you can insert a fork). Check once or twice whether you need topping up with hot water. The tinned chickpeas can simply be drained and used as is in section 3.

2.      Peel the Taro / Colocasia protecting your hands with gloves, the skin is usually tougher than potato, so you need a sharp knife. Remove all the brownish muddy skin until you get to the firm, white flesh. Then halve the taro lengthwise and slice each half across into about 1 cm / ½ inch thick slices then into 1 cm cubes. Rinse them under tap water, then pat dry them thoroughly. Heat up 1 ½ tbsp of the oil in a pan and fry the Taro / Colocassia cubes until golden. Drain excess fat on a kitchen paper.

3.      Heat up the remaining oil in a medium sized saucepan and sauté the onions. Drain chickpeas and mix in, cook until onions are soft. Now, add the fried Taro / Colocasia, season with salt and freshly milled black pepper, give the mixture a good stir, then pour in the stock. Bring to the boil, cover and let it simmer for about 7 minutes. Now, take the lid off and continue the cooking for another 5 minutes, by which time the Colocasia should be tender, not mushy and all the liquid has been absorbed. Stir in the prepared tahini sauce, mix it in thoroughly, give it 3 minutes to gently bubble, then switch off the heat.

4.      There are 2 ways to serve: hot with plain rice which makes it a meal in itself. You can also serve it at room temperature with Lebanese bread or just on its own.


Suggested websites


http://www.nutritiondata.com/facts/vegetables-and-vegetable-products/2674/2


http://www.fao.org/wairdocs/x5425e/x5425e01.htm


http://www.thaifoodandtravel.com/features/taro.html

Although less fattening than those made from the potato, colocasia chips are equally delicious. Instead of frying the chips, as in the traditional way, I bake them as oven chips. Because of its high starch content, it is advisable to par-boil colocasia, so it becomes much easier to handle.

At home, we used to serve it with Garlic & Sumac dressing on the side, however, you can use whatever sauce you like. 


Serves: 2-3


Ingredients.


·         550 g / 1 ¼ lb colocasia

·         1 ½ tbsp vegetable oil

·         Salt and freshly milled black pepper


Dressing


·         1 fat clove of garlic peeled and crushed to a paste

·         2 tbsp lemon juice

·         4 tbsp extra-virgin olive oil

·         1 tsp sumac


Method.


  1. Wash the colocasia and brush away any earth. Peel the colocasia and slice into chunky chips. Rinse a couple of times with cold water to get rid of the excess starch. Put in a saucepan of water, bring to the boil and cook for six minutes. Drain off the water and dry on kitchen paper.
  2. Meanwhile, pre-heat the oven to 190 °C / 375 °F, then pour the oil into the baking dish and pop it in the oven for five minutes.
  3. Next slide the dried chips gently into the hot oil, giving them a good coating. Season with salt and freshly milled black pepper, pop into the oven for 15 minutes. Take them out and turn them over, bake for another 15 minutes, at this stage, they should reach a light golden colour.
  4. While you are waiting for the chips, simply mix the ingredients for the dressing.
  5. Drain excess fat onto kitchen paper and serve hot, with the dressing in the middle, dip each chip in and enjoy. 

There are different varieties of endive but the one we use in this recipe (as shown in the photo) has a rosette of curly leaves dark green at the tips but lighter nearer the stem. Native to both China and the Mediterranean, it was grown on board English navy ships during the 16th century to prevent scurvy: http://thefoody.com/basic/vegce.html

It has multiple nutritional values (you could read about it on the websites I included at the end of the recipe) and is a delight for vegans, vegetarians and non-vegetarians. I haven’t seen this type of endive in Western supermarkets; however, it is available in Lebanese, Greek and Turkish grocers during the winter season.


Traditionally, it is cooked with olive oil and onions, but I also included garlic because it adds a lovely flavour. Some people boil it beforehand; I prefer to let it wilt while absorbing the flavours of the onion-garlic mixture.


Serves 2-3


Ingredients.


  • 500g/1lb 2oz endive
  • 4 medium onions: one finely chopped and 3 onions thinly sliced
  • 4 medium cloves of garlic peeled and crushed
  • 3tbsp vegetable oil
  • 3tbsp olive oil
  • 2 tbsp lemon juice and 1 lemon cut into wedges to serve
  • Seasoning: salt & freshly milled black pepper


Utensils. You need a medium sized pan and a medium frying pan


Method


1.      Cut and discard the very bottom ends of endive which may still have soil on them, then wash until you get rid of the grit. Drain the endive then dry on a tea towel. Now, take bunches of the endive and cut across the stem in 3 cm / 1¼ inch strips.

2.      Heat up the vegetable oil in the frying pan and throw in the sliced onions, fry stirring occasionally until they become crispy brown but not burnt. Drain on a double layer of kitchen paper. Keep aside.

3.      While the onion is cooking, you could make a start with the endive. Heat up the olive oil in the pan and stir in the finely chopped onions, let them cook for about 3 minutes then add the garlic and cook for another minute. Add the endive in batches to the mixture, stirring each around with a wooden spoon so that they absorb the other flavours. Season then cover and let the whole mixture cook for about 15-20 minutes, at that stage the endive should be tender.

4.      This dish is usually served at room temperature but it is also nice eaten hot. Just before serving drizzle with the lemon juice and scatter the crispy onions on top, place some lemon wedges around the dish.  Eat with Arabic or Pitta bread


http://www.juicing-for-health.com/endive-nutrition.html

http://www.wisegeek.com/what-is-curly-endive.htm

Newer entries »