General

You are currently browsing the archive for the General category.

Tomato Soup with Freekeh Shorbet Banadoura maa Freekeh

This tasty Freekeh Tomato Soup, Shorbet Banadoura maa Freekeh is made simpler and quicker by using ingredients usually found in the store cupboard:  tinned chopped tomatoes, stock cubes, freekeh and dried herbs. It is also versatile because both vegetarians and non-vegetarians can cook it as you could use either vegetable stock or beef stock. More effectively, the addition of freekeh gives it that nice nutty flavour which turns it into a warm comfort soup suitable for a wintery evening. 

Tomato Soup with Freekeh Shorbet Banadoura maa Freekeh

Freekeh Tomato Soup, Shorbet Banadoura maa Freekeh

The Freekeh Tomato Soup recipe described below makes two substantial portions. You can always double the quantity of the ingredients if you want more.

Serves 2

Ingredients for Freekeh Tomato Soup, Shorbet Banadoura maa Freekeh

  • 1 tin of chopped tomatoes weighing about 400g / 14 oz
  • 1 tbsp olive oil
  • 1 small to medium onion (about 100g/ 4oz) thinly sliced
  • 3 cloves of garlic sliced
  • 1 tsp dried mint
  • Vegetable or beef stock cubes that will make 450-500ml/ 15 -17 fl oz of stock.
  • 30g / 1¼ oz freekeh whole or cracked: either would do
  • Salt to taste and freshly ground black pepper
  • To garnish (optional), 1or 2 tbsp of freshly chopped herbs such as mint, parsley, coriander, fresh thyme.

Method

  1. I tend to process the chopped tomatoes in the food processor to give the soup a smoother texture, and I do that before cooking. You don’t have to if you don’t want.
  2. Using a medium setting, heat the oil in a medium sized pan then tip in the sliced onions and fry until just softened, a couple of minutes. Stir in the garlic and cook for another minute then pour in the processed or chopped tomatoes, mix in the dried mint followed by the stock. Give the mixture a good stir, increase the heat to bring to the boil, then reduce, cover the pan leaving a little gap and let the mixture simmer for 20 minutes. Meanwhile, soak the freekeh, especially if it is a loose one, to get rid of any dirt.
  3. When the simmering time is over, taste the mixture and season to taste then drain the freekeh and stir it in. Increase the heat briefly to bring the soup to the boil then simmer covered for another 15 minutes or more until the freekeh is cooked to your taste, some people like it with a bit of crunch, others don’t.
  4. Check again the seasoning and adjust if necessary, then serve as it is or sprinkle on top your favourite herb.

Enjoy your Freekeh Tomato Soup, Shorbet Banadoura maa Freekeh.

Tags: , , , , , ,

Roasted Vegetables and Green Wheat Freekeh Salad

Roasted green wheat freekeh (also known as freeka, frikeh or farik) is rarely used in western cooking although it is one of the oldest food ingredients in the world. The story goes that roughly 2000 years ago when towns and cities used to fight each other frequently, an eastern Mediterranean city was threatened with being besieged. Fearing to die of starvation, the people of that city picked all the wheat while it was still green and stored it. Unfortunately, it caught fire and was burnt. However, out of desperation, they tried to salvage what they could. To their surprise, they discovered as they rubbed off the burnt external skin, that the wheat itself remained intact and edible, they called it farik (later freekeh or freeka) which meant in their spoken Aramaic language the rubbed one. Ever since, roasted green wheat freekeh has become a valuable grain for cooking in the Eastern Mediterranean and North African countries.

The old method of preparation of roasted green wheat freekeh is that once the young wheat stalks are harvested, they are stacked in bunches and dried in the sun, then roasted in the field over an open fire. The aim is to burn off the bristles and the kernel’s outer skin or husk, the moisture within the young grain will protect it from burning while the process endows it with a distinctive smoky flavour. When the roasted wheat has cooled, the grains are shelled by hand, dried again but this time away from the sun, then they are either kept whole or cracked. In fact, some farmers in rural parts of the Levant still use this method. Of course, modern technology had inspired farmers and enthusiasts to develop new techniques to prepare freekeh faster, efficiently and in bigger quantities, like the Greenwheat Freekeh Company.

Freekeh or freeka is very nutritious. Scientific research has proven that green wheat retains more vitamins, fibres and proteins than any other grains. In fact, this link  describes the benefits of freekeh, providing detailed tables of the green wheat contents.

The next link to a youtube video gives you an idea how roasted green wheat freekeh is processed by modern farming

Most importantly, freekeh has a distinctive smoky and nutty taste and it is versatile, it can be cooked as a side dish or as a main course. We Lebanese use it mostly in salads and with meat, while neighbouring countries as well as North African ones have their own signature dish, most of their recipes including the Lebanese ones are on the internet.

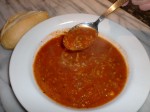
Here are my own versions for a salad suitable for all seasons and a heart warming soup.

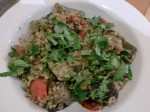
Roasted Vegetables & Green Wheat Freekeh Salad,

Freeka maa al Khoudra

This roasted green wheat freekeh salad is quite sustaining especially if you are a vegan, as well as that, it goes well with barbecued or grilled meat it can be eaten warm or cold, either way it is quite tasty. It is also ideal for picnics or packed lunches.

Roasted Vegetables and Green Wheat Freekeh Salad

Roasted Vegetables and Green Wheat Freekeh Salad

For this recipe I used coarse cracked freekeh (freeka), but you can substitute it with a whole grain one which might take a little longer to cook.

Serves 4-6

Ingredients

For the freekeh (freeka)

  • roasted green wheat freekeh (freeka) 1¼ cups
  • 2½ cups water
  • 2 tbsp Olive oil
  • 1 large onion finely chopped
  • Pinch of salt
  • 1 tsp cayenne pepper
  • 2 tsp dried mint

Dressing    

  • 3 or 4 tbsp lemon juice
  • 3 tbsp extra virgin olive oil
  • Salt to taste & freshly milled black pepper
  • About 30 g/1 ¼ oz fresh coriander, rough stalks discarded the rest is washed, dried then chopped

For the roasted vegetables

  • 1 aubergine about 400g / 14oz washed.
  • 450g / 1 lb juicy tomatoes washed then quartered
  • 2 medium courgettes washed then cut into 3 cm / 1¼ inch chunks
  • 2 medium onions peeled then quartered
  • 1 each red and yellow peppers quartered seeds removed
  • 1 tsp dried mint

For the garlic sauce

  • 3 cloves of garlic peeled
  • 4 tbsp olive oil
  • Salt & freshly milled black pepper

Equipment: 1 non-stick baking tray measuring about 30 cm x 22 cm (12 inches x 9 inches) and one non-stick medium sized saucepan.

Method

Preparing the vegetables

Preparing to roast the vegatables for the freekeh salad

Preparing to roast the vegatables for the freekeh salad

  1. I like to drain the excess bitter juice from the aubergine, it helps to roast better and to absorb other flavours, but it can work without it. With the skin on, cut the aubergine into 3 cm / 1¼ inch chunks then sprinkle over about 1 tsp salt and mix. Transfer into a colander, fit on top a suitable plate on which you place a heavy weight such as tins of tomatoes and leave for an hour to drain away some of the bitter juice. Next, rinse under a tap of cold water then dry thoroughly with a kitchen paper.
  2. When you are ready to cook, pre-heat the oven (fan oven) to 210°C / 450°F.
  3. To make the garlic sauce. Crush the garlic to a paste then add the olive oil, season, and mix well.
  4. Now, arrange the chopped vegetables in the baking tin, sprinkle over the dried mint and mix. Next, drizzle over with the garlic sauce and toss in the vegetables so they are well coated, season again with salt and pepper and give it a good stir. Pop it in the oven for about 30-40 minutes or until the vegetables start to brown round the edges.

To prepare the roasted green wheat freekeh

  1. Pre-packed freekeh is usually clean. If you have purchased it loose, it may contain some dirt, tip into a fine sieve and rinse a couple of times under a tap of cold water and drain well.
  2. Using a medium heat setting, heat the oil in the saucepan then tip in the chopped onion and cook for about 3 minutes. Next, add the freekeh (freeka) and sauté the mixture until all the grains are coated with oil, then pour in the water, add a pinch of salt, cayenne pepper and bring to the boil. Reduce the heat slightly, stir in the dried mint and simmer for about 20-25 minutes by which time the water should have been absorbed while the mixture remains moist and the grains have softened. It is worth checking the mixture when simmering, so if it is cooking dry, top it up with a little more boiling water. If using whole grain freekeh (freeka), increase the amount of water by roughly 85 ml/ 3 fl oz and simmer for a longer time. Once the freekeh (freeka) mixture is cooked, let it stand covered for 5 minutes before assembling the salad.

Assembling the salad.

  1. Tip the cooked freekeh (freeka) over the roasted vegetables, so the roasted green wheat freekeh would absorb all the juices and gently fork it in, adding the chopped coriander and drizzling along the dressing, so all the flavours mingle together. Transfer into a large salad bowl and serve.

Tags: , , , , ,

Lebanese bread is a fundamental staple in Lebanese cuisine, and perhaps it dates back to Phoenician times. In fact, the Egyptian philosopher Athenaeus who lived in the third century A.D wrote that the best bakers were brought from Phoenicia

http://www.foodtimeline.org/foodbreads.html

Lebanese bread is made from wheat flour, however, the Lebanese wheat grain is hard with a high gluten content which in turn contributes to the elasticity of the dough. People, including some Lebanese food writers, mistakenly call Lebanese bread Pitta Bread. It is true, that Pitta bread is the closest one to ours and a nice one too, but it is not the same, even supermarkets clearly make this distinction as they package them labelled with the appropriate name. Lebanese bread or as some also call it Arabic bread is round, thinner and more malleable: you can easily open it without breaking it. It is made to suit the Lebanese dishes and act as a perfect wrap for the different varieties of Shawarma, Kafta and so forth. Also, Lebanese bread comes in many sizes varying from the tiny little round ones, to medium sizes, to the large ones, about 30cm/ 12 inches.

Another type of bread is called Khubz Marqooq (Paper Thin Bread). It is literally very thin bread. Before baking was industrialised, Marqooq was a speciality that required lots of practice and skill. This was a tradition of the mountain villages whose women passed it from mother to daughter.

In this section, I included the basic recipe for the Lebanese bread, and there will be others for flat bread that is baked with a number of traditional toppings such as Manaeesh b’Zaatar (Thyme), Lahm b’Ajeen (Minced Meat) and Manaeesh b’Kishik (Dried Yoghurt).

Ajeenat al Khubz (Basic Bread Dough)

When making bread, the flour should be slightly warm, it makes a difference in speeding up the whole process. One more tip is heating up the baking sheets before baking the bread, the idea is to keep an even oven temperature and help the bread to puff up.

In this recipe, I use easy blend yeast, however, dried or fresh yeast also work well but you have to check the equivalent amount to the one recommended for the easy blend in this recipe. Whatever you decide to go for, follow the instructions of the manufacturer.   

Makes about 8 to 9 pieces.

Ingredients.

  • 400g/14 oz strong white flour, slightly warmed plus a little extra plus for dusting
  • 1½ tsp salt
  • 1 tsp easy blend yeast or its equivalent of fresh or dried yeast
  • About 200ml/ 7fl oz lukewarm water
  • 1 tbsp vegetable oil plus a little extra for greasing

You also need baking parchment paper cut to fit the baking sheets.

Method

  1. Sift flour and salt into a large mixing bowl then mix in the yeast. Mix the oil into the water. Make a well in the centre of the bowl and gradually tip in the water-oil mixture. Using your hands, combine all the ingredients, depending on the flour, you may need to add some more water, the dough should feel elastic and come away from the sides of the bowl. Transfer the dough to a lightly floured surface and knead for about 8-10 minutes. Alternatively, you could do the whole process in an electric mixer using the dough hook, thus reducing the kneading time by half (for about 5 minutes). In the end, the dough should feel spongy and elastic.
  2. Shape the dough into a ball then transfer to a lightly greased bowl and cover with a polythene bag or cling film, but make sure that they are oiled to prevent the dough from sticking. Leave it in a warm place until it has doubled in size. The rising time usually takes one or two hours.
  3. When the rising time is up, pick up the dough and put it on a lightly floured surface. Punch it to get rid of the excess air, then knead again for about 3-4 minutes, alternatively, let the mixer do the kneading for 2 minutes.
  4. Divide the dough into 8-9 equal balls. On a lightly floured surface, roll out with a lightly dusted rolling pin each ball to 16cm/ 6½ inches circle, 3-4mm/ 1/8 inch thick. Alternatively, you can make nicely shaped circles by using large cutters. Place the dough circles on the prepared baking parchment papers, cover and let them rest for another 20 minutes. Meanwhile, pre-heat the oven to 230 ºC/ 450ºF, heating up at the same time the baking sheets. When the resting time is up and ready to bake, slide the dough circles with their baking parchment onto the hot baking sheets, you may need to do them in batches. You have to be quick when you open the oven, as it is very important to maintain the same temperature all the time.
  5. Bake for 4-8 minutes until they puff up like an inflated balloon, the colour should be lightly golden.
  6. Transfer to a wire rack to cool slightly but, do not stack the baked ones on top of each other, until they are cool. If you are not consuming all the bread at once, you can keep the rest in the fridge for a couple of days or freeze it.   

The Lebanese custom after finishing a meal is to serve a selection of the seasonal fruits. Sweet pastries, such as baklawa or heavy dessert are served in smallish quantities with Turkish coffee or minted tea. Desserts in Lebanon are also associated with special occasions, Kellaj for instance is eaten during the holy month of Ramadan, whereas mamoul (nut pastries) rass bil-tamer (date pastries) are consumed during the festivities of Easter, meghli (spiced fragrant rice pudding) used to be served to celebrate the birth of a baby boy but nowadays, it can be either.

Nothing is more relaxing than the pleasure of sipping Arak, beer or wine while savouring little assortments of mezza dishes and conversing with family and friends. The Lebanese mezza is usually preceded by a pre-mezza which is basically a dish of raw vegetables. Here in London, Lebanese restaurants put a large bowl in the middle of the table which contains the heart of a Romano lettuce, 2 or 3 small cucumbers, 2 large Mediterranean tomatoes, one pepper and strips of carrots. This is usually accompanied by a small dish of black and green olives, and sometimes a small assortment of pickles.

The mezza itself consists of hors-d’oeuvres starting with the cold dishes then progressing to the hot ones. The number of dishes varies according to the occasion and wealth of the host/ess, in the past, it could extend to 40 or 50 dishes. This explains the variety of dishes including dips, salads, cheeses, fish, meat and assortments of savoury pastries. Nowadays, given the new wave of health issues and the dilemma of obesity, the amount of dishes has shrunk, for example a set menu for 4 people at a Lebanese restaurant usually limits its starters to 8, 4 cold and 4 hot which sounds reasonable in relation to the rest of the menu: main course and dessert.

This sauce goes well with any type of grilled meat: chicken, kafta and lamb. The classical recipe requires a substantial amount of garlic, it gives it a wonderful taste which complements any grilled meat. However, if you find that garlic is too strong reduce the amount.


Another thing, I find it better to prepare an hour or two in advance so the flavour  develops, having said that,  Toomeh is better consumed the same day or within 48 hrs. Originally this is a Lebanese mayonnaise like garlic sauce made with with egg yoke, breadcrumbs, olive oil and lots of crushed garlic. Sometimes this is tricky to make, so I came up with my own simplified version.


Serves 4 people


Ingredients


·         1 medium to small potato peeled, cut into chunks. Put in a small pan covered with water

·         8-10 cloves of garlic peeled and crushed to a smooth paste

·         2tbsp organic mayonnaise

·         2 tbsp plain yoghurt

·         1 tbsp lemon juice or to taste

·         Salt & freshly milled black pepper


Method


  • Add a pinch of salt to the potato and bring to boil, simmer until ready to mash
  • Meanwhile, crush the garlic to a paste. 
  • Once the potato is cooked, drain from water, leave it for about 30 sec uncovered to make sure it is dry, you don’t want any excess of water. Add the potato to the garlic paste, mash them together until you have the consistency of creamed potato. Grind some freshly milled black pepper.
  • Add mayonnaise followed by yoghurt and lemon juice. Mix with the spoon until all the ingredients are well combined. Taste and adjust if necessary.
  • Cover and keep in the fridge if you are not using it immediately, but always serve at room temperature.